Quantcast
Channel: Technical – Winhost blog

Getting Started with RavenDB

$
0
0

howto

Over the years there have been a number of customers who have asked if Winhost supports NoSQL databases. There is actually one NoSQL solution you can install in our environment, and it’s RavenDB. In this guide, I will show you how to get started with it (i.e. installed and running) if you want to try it out. The instructions have been taken from the official site and modified for our hosting environment.

First, download the .zip file from the RavenDB website and then extract it. Open up the “Web” folder and make the following changes to the web.config file in that folder:

Change line 3 from:

<add key="Raven/WorkingDir" value="APPDRIVE:\Raven\" />

To:

<add key="Raven/WorkingDir" value="APPDRIVE:\web\ftpusername" />

Replacing ftpusername with the correct value.

Add/Insert the following in between the <system.web></system.web> XML tags to enable Full trust:

<trust level="Full" />

Once you have finished making the changes to the web.config file, save it. Then upload the entire “Web” directory into your hosting space.

Using the Winhost Control Panel, create an Application Starting Point for the “Web” folder. Open the “Web” folder using a browser (e.g.: http://www.HostingAccountDomain.com/web).

You’ll get an error regarding WebSockets. You can open up a support ticket to have it enabled and have “Overlapped Recycle” disabled in your App Pool settings, and that should complete the installation so that you can try it out.


Upgrading DotNetNuke

$
0
0

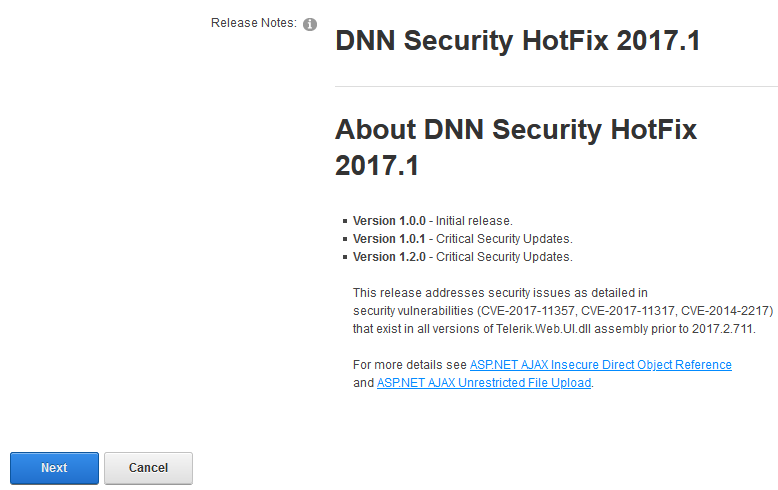
It’s important to keep your web applications up-to-date. This prevents known vulnerabilities from being exploited and wreaking havoc on your site. That goes for any third-party software you might use on your site, but today we’re going to talk about updating DotNetNuke.

The most important thing before upgrading is to back up your current DotNetNuke site. Also, if you are using any third-party themes or modules, please contact the author(s) before upgrading to make sure they are still supported in the latest version of DNN.

Backing up the MS SQL database

  • Log in to Control Panel
  • Click the Sites tab
  • Click your site account
  • Click MS SQL Manager
  • Click Manage next to the MS SQL database your DNN site is using.
  • Next to Tools, click Backup
  • Click Create Backup

This will place the backup of your MS SQL database within the App_Data directory with the file extension “.bak.”

Backing up your web site files via FTP

Downloading the upgrade files and Extracting

Important: you must know your SuperUser account login in order to upgrade.

You can download the Upgrade files through DNN’s download page.

  • Download the UPGRADE PACKAGE Files needed for upgrading an existing installation of DNN Platform.
  • Once downloaded, unzip the files on to your computer, keeping the directory structure intact.

Uploading the updated files

  • Connect to your site via FTP and navigate to the directory where you have DNN installed.
  • Upload the UPGRADE PACKAGE files you just downloaded into the directory. If your FTP client asks you to overwrite the files go ahead and overwrite them.
  • Once the upload is complete, go to the next step.

Upgrading

  • Visit your site where you have DNN installed.
  • DNN will ask you to login as the SuperUser account. Then click on the Upgrade button.
  • DNN will be upgraded to the latest DNN installation.

Making a MySQL database backup using MySQL Workbench

$
0
0

banner-howto

Note: The manual methods in this tutorial are great, but if you’re looking for a “set-it-and-forget-it” automated backup solution, we offer a site backup service that can also back up your MS SQL and MySQL databases. Read about it on our site, or activate it in Control Panel. It’s easy, it’s inexpensive and it’s cool. What more could you ask for?

Making a backup in MySQL workbench is a pretty easy task once you know what to do, but it can be a little confusing the first time around. Allow us to save you some time with these simple instructions.

Version 6.3.7 is shown here, and of course future versions may differ. Download MySQL Workbench here (you’ll need a free Oracle account if you don’t already have one – just click the “Register” link in the upper right corner of that download page).

First thing you’ll need to do in Workbench is connect to your database.

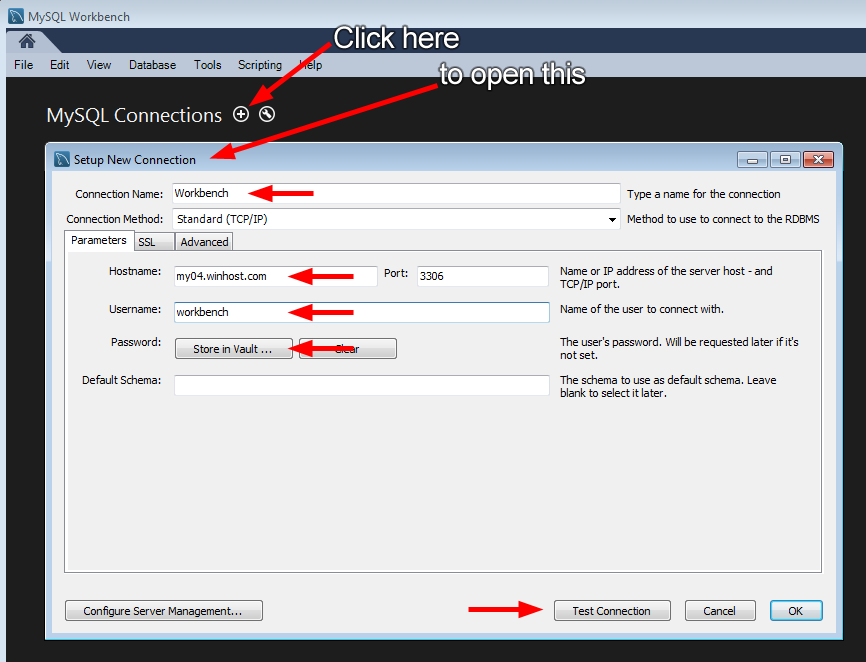
  • Click the + icon to open the new connection window.
  • Give the connection a name.
  • Enter the MySQL server hostname (you can find that in the MySQL Manager in Control Panel).
  • Enter your database username.
  • Click “Store in Vault” to enter your database password.
  • Click “Test Connection.”

workbench1

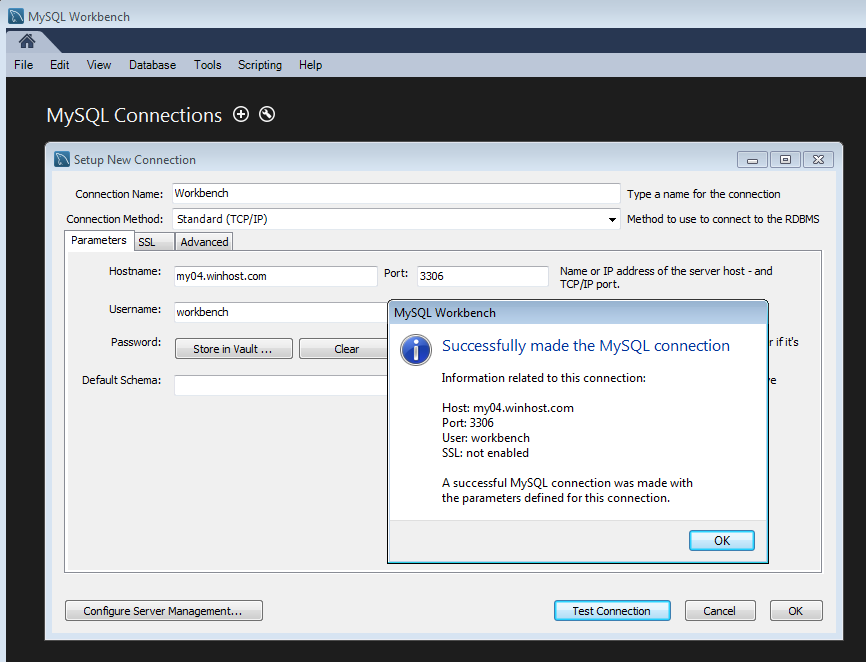
If everything is correct you’ll see the successful connection box.

workbench2

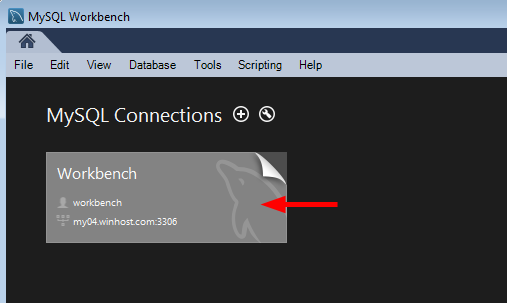
Go ahead and close that, and click the connection that you just set up.

workbench3

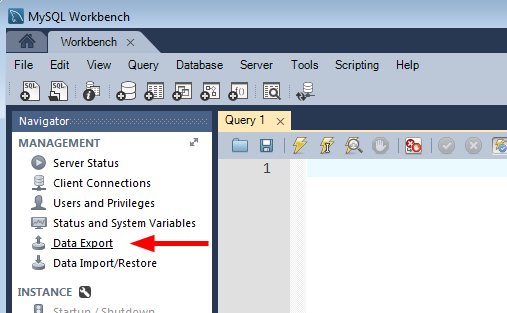
Click “Data Export.”

workbench4

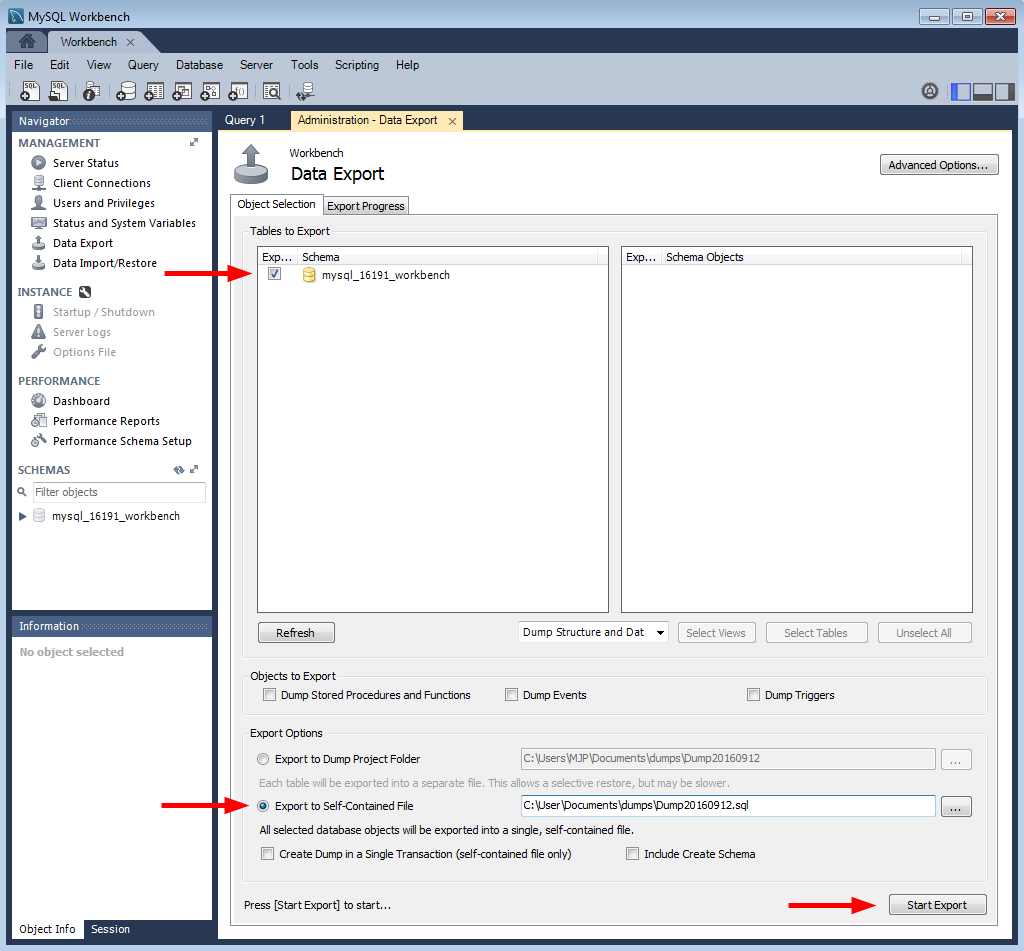
There are a lot of options on the next screen. For the purposes of this how-to we’re just making a simple backup of the entire existing database, so we’re not going to use most of those options. But as you can see, you can do a lot more than just a simple database dump here.

  • Select your database in the “Tables to Export” window.
  • Choose “Export to Self-Contained File” and make note of the path. That’s where your backup(s) will be located.
  • Hit the “Start Export” button.

workbench5

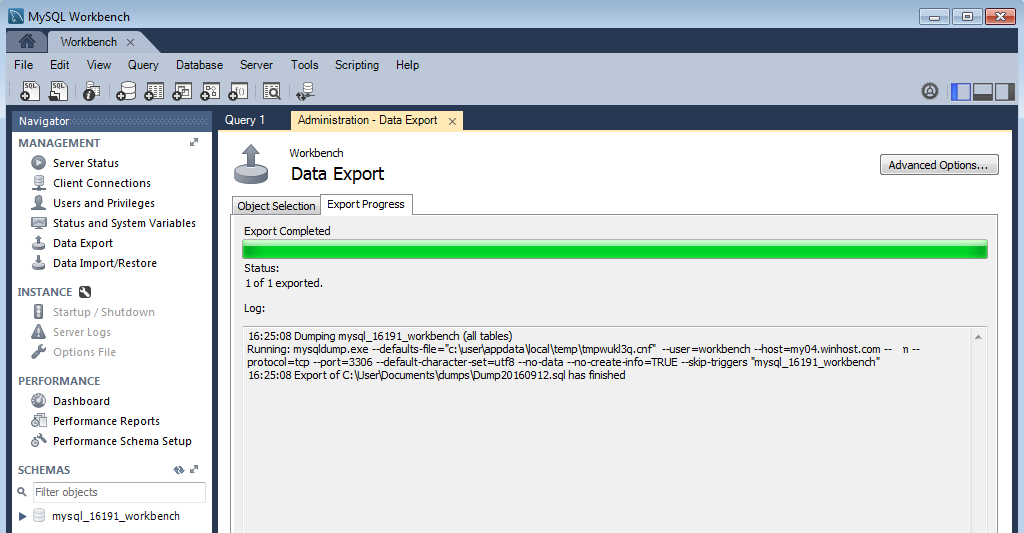
If everything goes according to plan you’ll see the “Export competed” dialog, and you’ll be all set. Your database is backed up for development use or simply for safe keeping.

workbench6

That’s all there is to making a backup.

But check out the “Data Import/Restore” link right under the “Data Export” link. As you might have guessed, you use that link to restore a locally stored backup up to the MySQL server here at Winhost. We’ll talk about that in a future article.

Deploying a .NET Core 1.0 Application

$
0
0

banner-howto

Now that we support it, here’s a quick tutorial on how to deploy an ASP.NET Core 1.0 Application to Winhost using Web Deploy.

  • Log into your Winhost Control Panel.
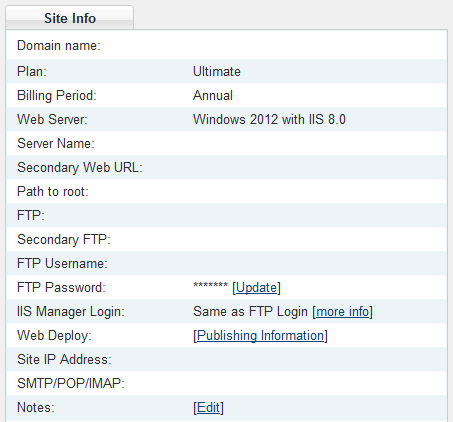
  • Go to the Site Info section and click on the Publishing Information link to the right of Web Deploy.

SiteInfo

  • Click on the Download button to download your publishing profile.
  • Download this PowerShell script from GitHub and place it in C:\Program Files (x86)\Microsoft Visual Studio 14.0\Common7\IDE\Extensions\Microsoft\Web Tools\Publish\Scripts\1.1.0\publish-module.psm1. If you can’t find this directory, then check to see if you’ve installed Visual Studio to another location (e.g. D: or E: drive).
  • Launch Visual Studio and create or load your project.
  • When you’re ready to publish, go to Build -> Publish solution_name.
  • Select the Import option and browse to the publishing profile that you downloaded above. Click OK to load the profile.
  • In the Connection section, append this query string at the end of the URL in the Server field: ?site=site_name where site_name is the primary domain name of your website.
  • Click the Validate Connection button and make sure you get a green check mark. If you get a green check mark, then you can proceed to click the Publish button to deploy your website.  If you get a yellow warning sign, then you can open up a support ticket so that we can help you troubleshoot the problem.

Please note that you cannot publish to a sub-directory using Web Deploy at this time due to a bug which Microsoft will correct at a later date.  If you want to publish your application to a sub-directory, you will need to use FTP.

How to Install Magento 2.1.2 on Winhost (IIS)

$
0
0

Magento is one of the leading e-commerce platforms available today with a market share of about 30% among the 30 most popular ones according to Wikipedia. I’ve tried playing around with it in the past, but I was never able to install it and configure it correctly on Windows until now.

Prompted by one of our customer’s request for help, I decided to investigate the problem further. Although Magento was never designed to be supported under IIS (even their developers say so), it is entirely possible to run it under IIS, and I will show you how (and cover some pitfalls you might encounter along the way).

Unfortunately, to get Magento running on Winhost, you’re going to need to install IIS and PHP (preferably version 7.0+) on your own machine and install it there first. That’s because you’ll need to run a command through their CLI (Command Line Interface) to deploy some static files (i.e. .css, .js, etc.) so that it will render correctly in a browser.

It took me weeks to figure out, but the CLI won’t process an argument correctly (i.e. it doesn’t think it exists) unless it thinks Magento has been installed already (i.e. you can’t just run the CLI after extracting the files from the .zip. You’ll need go through the browser setup wizard first.)

I’m afraid I won’t have time to go into details about how to install IIS and PHP on your machine because the process can be different for different versions of Windows, but there are plenty of guides out there on the Internet if you need help. You could even save yourself some time and trouble by using an all-in-one installer like EasyPHP Devserver.

Now, on to the tutorial.


Prerequisite Steps

First, you need to create a MySQL database through the Control Panel.

Click on the Sites tab.

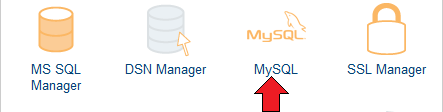
sitesClick on the link to your domain name and then click on the MySQL icon.

mysql

Click the Add button and enter the values for Database Name, Database User, and Quota. Click the Create button to finish creating the database. Now click on the Manage link and record the connection information (Database Name, Database Server, Database User, and Database Password) on a piece of paper or a text editor such as Notepad.

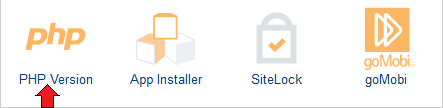
Now go back to the Site Tools section of the Control Panel (where you clicked on the MySQL icon) and click on the PHP Version icon.

php

Set the PHP version to 7.0 – Beta in the drop-down box and click on the Update button.


Installing and Configuring Magento on Your Local Machine

After you have setup IIS and PHP on your local machine, download the source code from Magento’s website.

Extract the contents using a decompression program such as WinZip or 7-Zip. Now, open up the file DbValiditor.php which is in .\setup\src\Magento\Setup\Validator in a text editor and edit line 106.

Change it from:

return $this->checkDatabaseName($connection, $dbName) && $this->checkDatabasePrivileges($connection, $dbName);

To:

return $this->checkDatabaseName($connection, $dbName); //&& $this->checkDatabasePrivileges($connection, $dbName);

Basically, you want to comment out the database privileges validation check, or you will encounter this error when you get to Step 2 of the installation wizard:

Database user does not have enough privileges. Please make sure SELECT, INSERT, UPDATE, DELETE, CREATE, DROP, REFERENCES, INDEX, ALTER, CREATE TEMPORARY TABLES, LOCK TABLES, EXECUTE, CREATE VIEW, SHOW VIEW, CREATE ROUTINE, ALTER ROUTINE, EVENT, TRIGGER privileges are granted to table ‘mysql_#####_magento’.

You get this error because some permissions cannot be granted to you in a shared hosting environment (e.g. CREATE DATABASE).

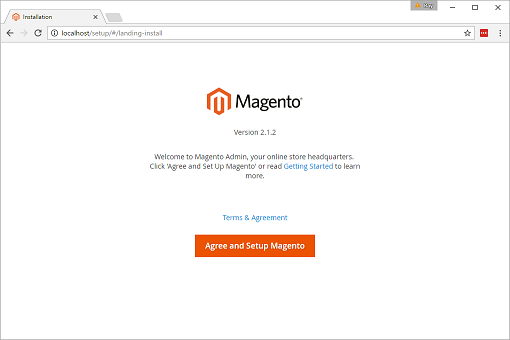
Add a site to IIS, move the extracted files to new site that you created, and then launch the site in a browser. If everything has been installed and configured correctly, it will start a wizard, and you should get a screen like the one below.

installwizardClick on the Agree and Setup Magento button to continue.


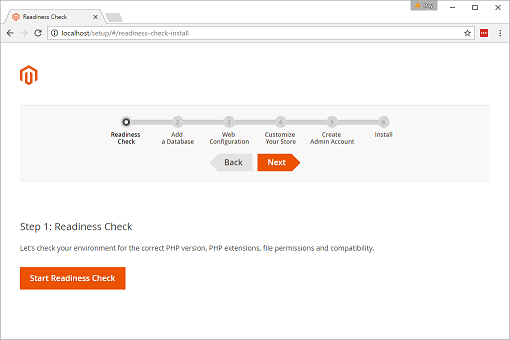
Step 1: Readiness Check

Click on the Start Readiness Check button to make sure everything is configured correctly (e.g. you might need to enable some PHP extensions before you can continue). Click on the Next button if everything checks out.

step1

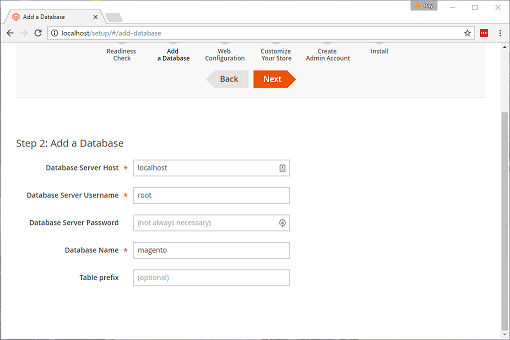
Step 2: Add a Database

On this page, fill out the fields with the connection string information to your Winhost database that you recorded earlier. Click on the Next button to proceed.

step2

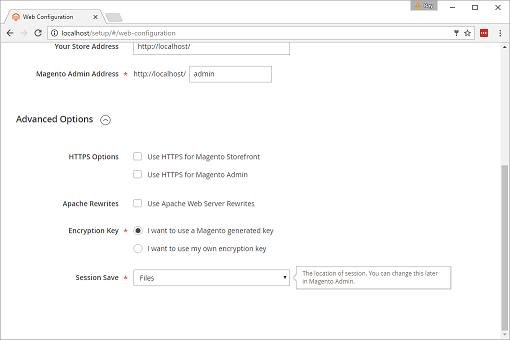
Step 3: Web Configuration

On this page, you can change the default Magento Admin Access directory. You should definitely change the Your Store Address field to that of your domain name and uncheck Apache Rewrites. Click on the Next button to continue.

step3

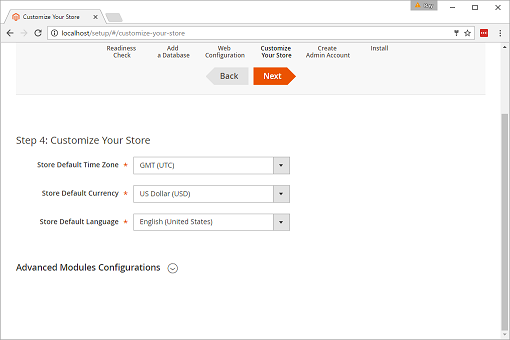
Step 4: Customize Your Store

There’s nothing on this page that needs to be changed, so you’re welcome to customize Magento further if you want before clicking on the Next button.

step4

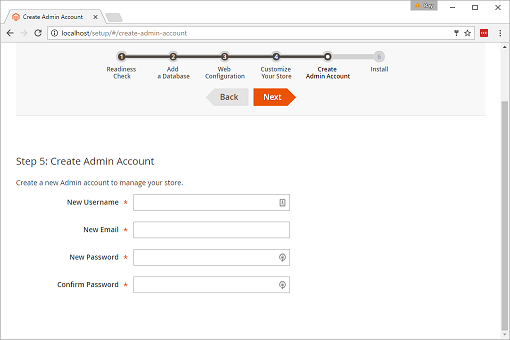
Step 5: Create Admin Account

Page is self-explanatory. Click on the Next button when you’re done.

step5

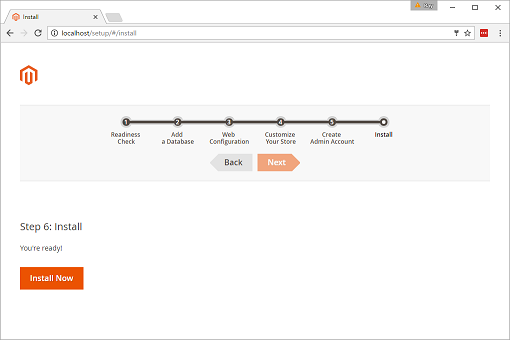
Step 6: Install

Like the page says, you’re ready. Click on the Install Now button.

step6

Success

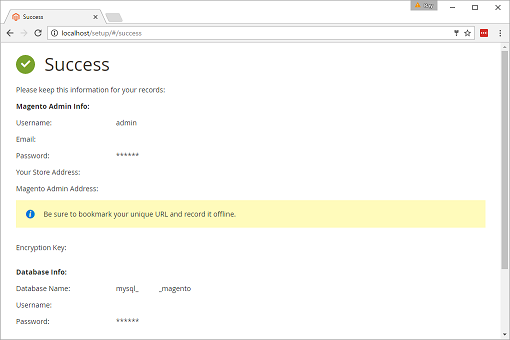
Once the installation has completed, you should see a screenshot like the one below.

success

Edit your php.ini file and make sure your memory limit is set to at least 256 MB. The following is the line you should look for with the correct markup:

memory_limit = "256M"

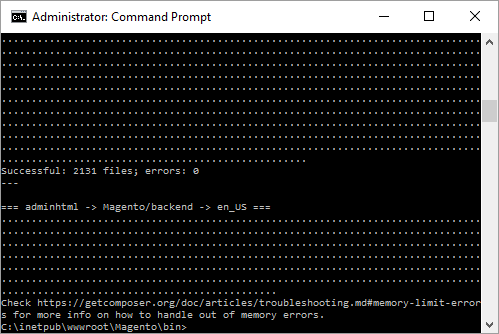
This should prevent the error below from being thrown when executing the next step. (I had mine set at 128 MB when I encountered the error.)

Check https://getcomposer.org/doc/articles/troubleshooting.md#memory-limit-errors for more info on how to handle out of memory errors.

memoryerror

Now open up the command prompt with Run as administrator and navigate to Magento’s bin directory and type in the following command:

php magento setup:static-content:deploy

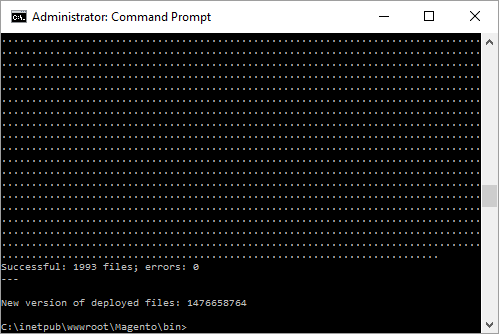
This will deploy the necessary files to the \pub\static directory that will render Magento’s UI correctly. If it’s successfully, you should get the following message:

New version of deployed files: 1476659614

clisuccess

If you encounter the error I mentioned earlier, you could also try running the command again (this also worked for me). You just need to make sure each section says “Successful”, and it ends with “New version of deployed files”, otherwise, you may have some further troubleshooting to do.

Create a web.config file with the following markup and place it in the root of the Magento installation:

<?xml version="1.0" encoding="UTF-8"?>
<configuration>
  <system.webServer>
    <rewrite>
      <rules>
        <rule name="Imported Rule 1" stopProcessing="true">
          <match url=".*" ignoreCase="false" />
          <conditions>
            <add input="{URL}" pattern="^/(media|skin|js)/" ignoreCase="false" negate="true" />
            <add input="{REQUEST_FILENAME}" matchType="IsFile" negate="true" />
            <add input="{REQUEST_FILENAME}" matchType="IsDirectory" negate="true" />
          </conditions>
          <action type="Rewrite" url="index.php" />
        </rule>
      </rules>
    </rewrite>
  </system.webServer>
</configuration>

This is required so you can access the Admin Interface.

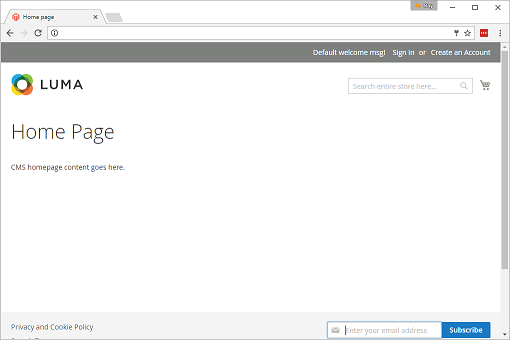
Upload all the files to your Winhost account. Now, enter the URL of your domain in a browser. You see a screen like the one below.

lumatheme

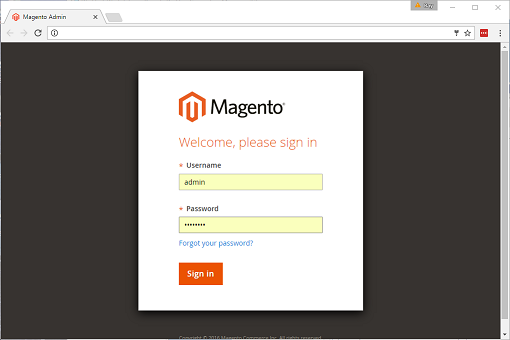
And if you try to access the Admin Interface, you should get a sign in screen that looks like this.

adminsignin

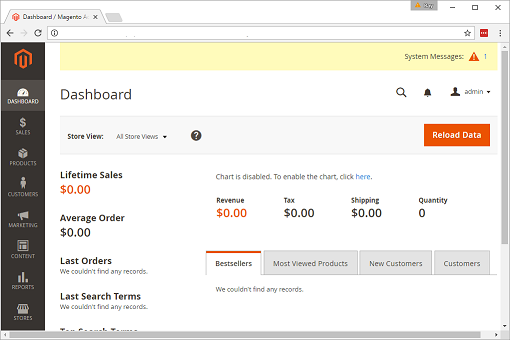
After signing in, the dashboard should look like this.

dashboard

That’s it! Magento is ready to go. Since I’m not a Magento expert/developer, I can’t comment further, but from the documentation I read, it looks like you might need to execute this command:

php magento setup:static-content:deploy

Every time you change something (code, plug-in, theme, etc.). I recommend doing the development work on your local machine first, testing it, and then re-deploy all the files again to the server to make updates.


Installing Jetpack for WordPress on Winhost

$
0
0

banner-fotw

Jetpack is one of the most popular plugins available for WordPress (with over 29 million downloads!), created by Automattic – the same people who made the WordPress app itself. It’s a Swiss Army knife for you site with over a dozen different functions all rolled into one plugin.

It includes essential tools like a website stats, subscriptions, social network sharing and a contact form. It will also hookup with WordPress.com to perform related posts and website uptime monitoring. And it’s free!

jetpack-logo

If you try to implement Jetpack on Winhost, it won’t work out of the box. By default, we filter requests to the xmlrpc.php file. WordPress.com will try to ping that file during the activation process and it will fail.

One of the reasons we block requests to the xmlrpc.php file is because of an exploit hackers can use to get your WordPress username and password. You can read about the exploit in this excellent Sucuri article.

If you don’t want to bother reading the article, in short, hackers can try thousands of username/password combinations with one request and try to brute force their way into your WordPress site.

But don’t worry, you can still get Jetpack to work by simply overriding our default request filtering. You just have to add this setting in your web.config file:

<configuration>
   <system.webServer>
      <security>
         <requestFiltering>
            <denyUrlSequences>
               <clear />
            </denyUrlSequences>
         </requestFiltering>
      </security>
   </system.webServer>
</configuration>

If you just have a WordPress site on our service, or if you used our App Installer to install WordPress, you might not have a web.config file on your site, so you’ll have to create one. Just follow these instructions:

  1. Open the Notepad application (or similar application) on your computer
  2. Paste the following into Notepad:
    <?xml version=”1.0″ encoding=”UTF-8″?>
    <configuration>
    <system.webServer>
    <security>
    <requestFiltering>
    <denyUrlSequences>
    <clear />
    </denyUrlSequences>
    </requestFiltering>
    </security>
    </system.webServer>
    </configuration>
  3. Save the file as web.config (not as a .txt file). If using Notepad, click File and Save As. In “Save as type”, select All Files (*.*). In “File name”, enter: web.config
  4. Click Save
  5. Upload the web.config file to your root folder through FTP

You should now be able to activate the Jetpack plugin. But before you go, there’s the pesky security issue! Your xmlrpc.php file is now susceptible to that security exploit, which may allow hackers to get your username and password. Let’s fix that!

SiteLock

The best way to prevent the xmlrpc.php brute force exploit is to get SiteLock with TrueShield CDN. You will need both SiteLock and TrueShield. TrueShield will block those suspicious requests trying to get your username and password, and protect your site from all sorts of other bad stuff not covered in this article. (If hackers were limited to just one exploit, our jobs would be so much easier!) We highly recommend getting SiteLock and TrueShield. It will block malicious bots, comment spammers, and likely make your site faster, too!

Another solution would be to use Jetpack’s own Protect function. You have Jetpack installed, now use it! Just activate the Protect feature in Jetpack in the Admin panel. The Jetpack team confirmed that it works.

Finally, though perhaps foremost: always use a strong password for your site! Please don’t use qwerty123 or pa$$w0rd.

Actually, do all three – get SiteLock with TrueShield, activated Jetpack Protect, and keep those passwords strong!

How to create an FTP user that can only access a specific folder

$
0
0

banner-fotw

Sometimes you want to give someone FTP access to your site, but you don’t want them to have access to all of the site files. So we’re going to go through the steps to set up an FTP user that only has access to a directory that you specify.

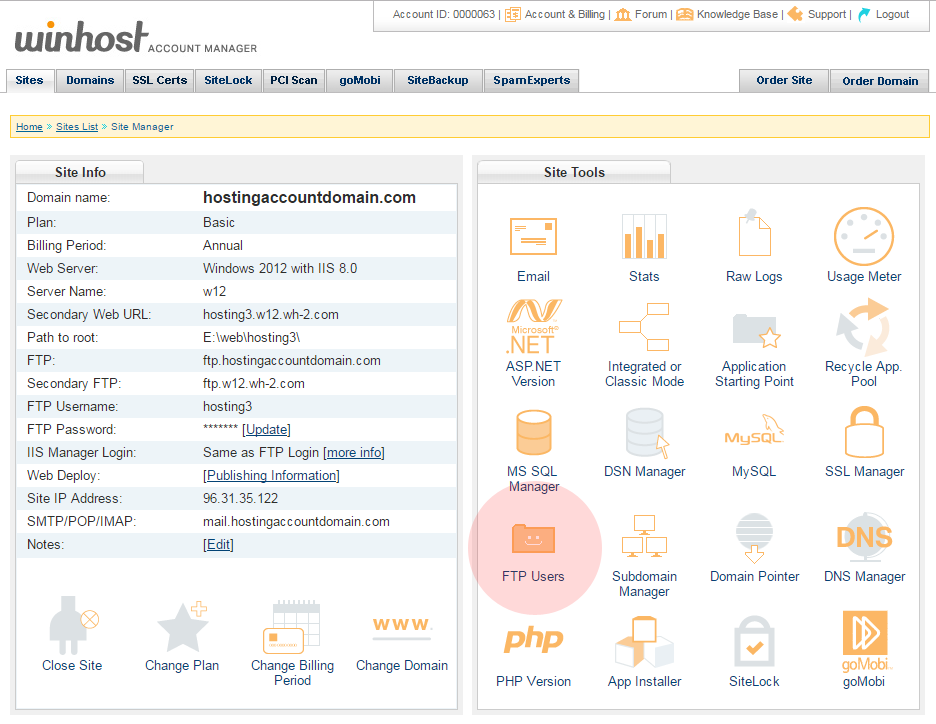
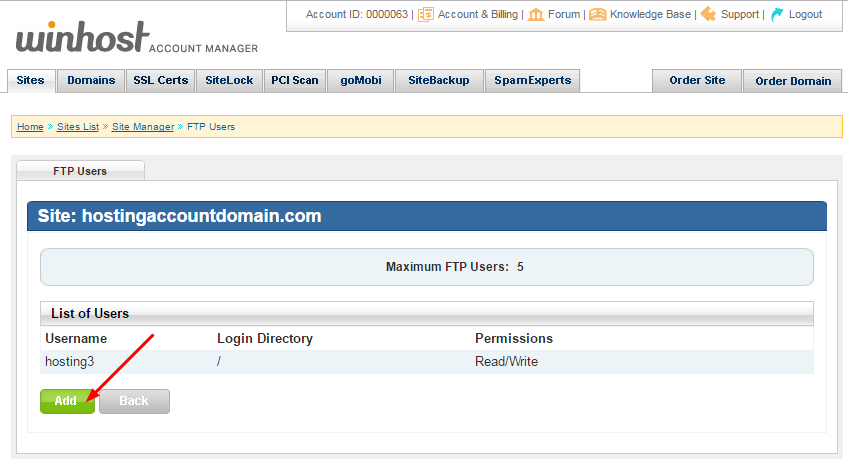
no1The first thing we’re going to do is go to the Site Tools section of Control Panel and click on the “FTP Users” icon or link:

fotwftp-1

no2Click the “Add” button:

fotwftp-2

no3Enter a username (it will be appended to the primary FTP username, that format can’t be changed) and a password. Enter the directory name or click the “Browse” link to choose from directories on the server:
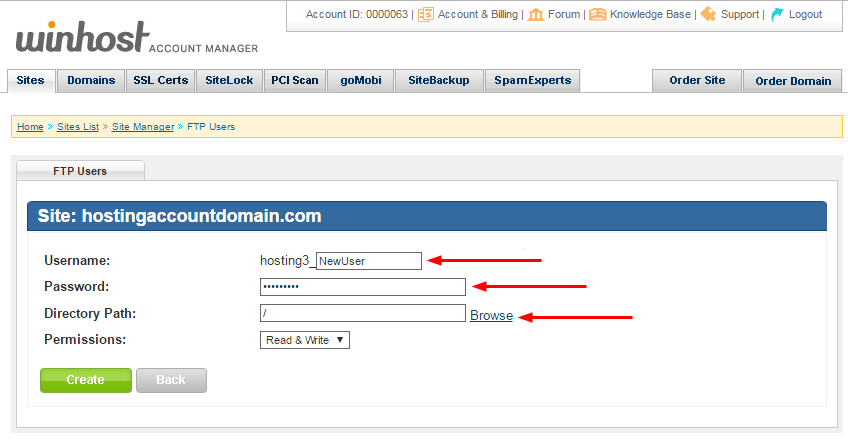
Note that entering the name of a directory that does not exist does not create that directory on the server. You must enter the name of an existing directory.

fotwftp-3

no4If you clicked the “Browse” link, select the directory (it will turn bold and the path will be automatically entered in the text field below) and click the “Select” button:
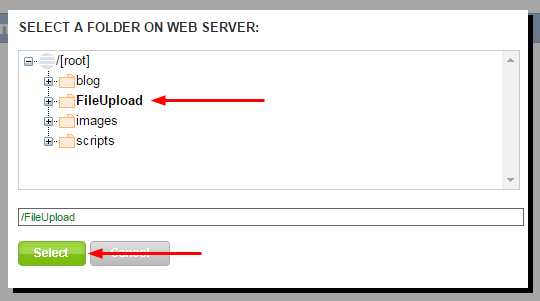
fotwftp-4

no5Make sure you leave the “Permissions” field set to “Read & Write,” since this user will be uploading files (the other option is “Read Only”). Click the “Create” button:
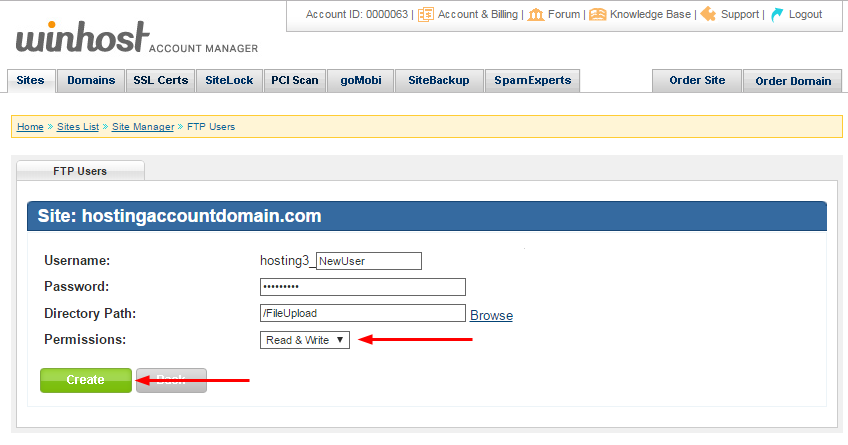
fotwftp-5

no6When the user is added you will see it listed in the FTP Users section. Here you have the option to update the user’s password, or delete the user. The username cannot be edited once the user is created.
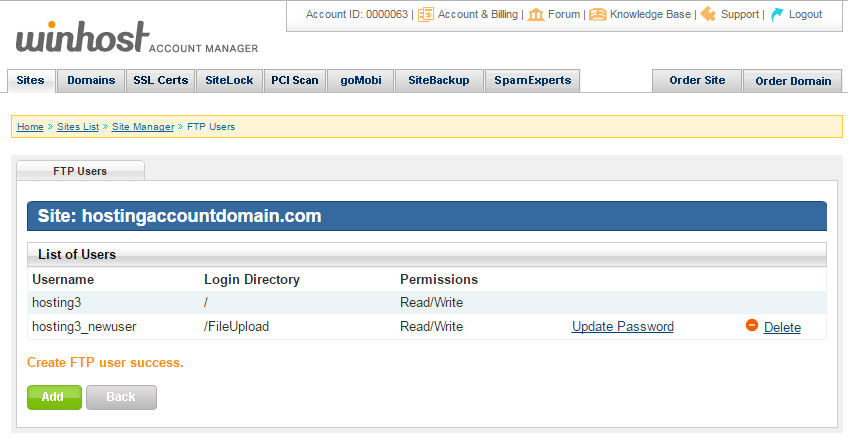
fotwftp-6

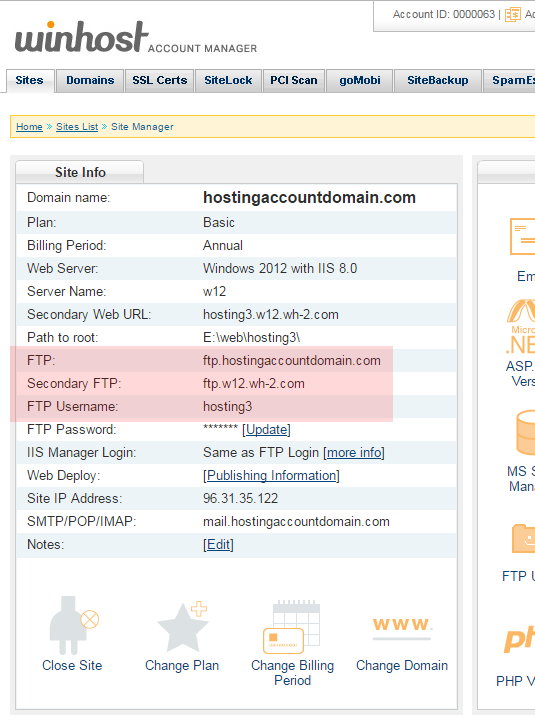
no7The new user will log in to the same hostname as your existing user(s), but of course the username and password will be those that you just created.

fotwftp-7

New Rules for Domain Owner Information Updates Start Today

$
0
0

Starting today, December 1st, new ICANN rules are in effect that change the way some domain contact information changes are done. The change affects all generic top level domains, such as .com, .net, .org, .biz, .info, etc., (including all of the new domain extensions, like .blog, .photo, etc.). Country code domains (.uk, .TV, .co, etc.) are not affected.

When you change the first name, last name, email address or organization for the registrant (i.e., the domain name owner) you have to acknowledge the change in two separate emails. This applies to changes made to the registrant’s contact information. Changes to the admin, billing and technical contacts are not affected.

Changes to the registrant’s name, organization or email information are now treated the same way a “registrant change” was treated in the past. But in the past the registrant change was assumed to be a change of ownership from one person to another, so emailing both parties was necessary.

Now those emails are triggered any time you update your name or email address, and two emails will go to the same person. You need to approve the change by clicking the link in both emails, or the change will fail.

To avoid problems or delays

  • Take a few minutes to make sure your registrant information is up to date, especially the email address.
  • When you change the first name, last name, email address or organization for the registrant, but are not transferring ownership to another person, make sure you approve the change by clicking the link in both emails that you receive.
  • You can avoid dealing with the multiple emails by granting our domain registrar OpenSRS “Designated Agent” status, which will give OpenSRS the right to automatically approve these updates for you. This option is available on the confirmation page that is linked to in the change approval emails.

If you want to learn more about the new policy, check out this Knowledge Base article.


Filezilla ENETUNREACH FTP Error with Kaspersky Anti-Virus

$
0
0

If you’re using the anti-virus application Kaspersky Endpoint Security 10 for Windows and Filezilla for FTP, you might have encountered an ENETUNREACH “Network unreachable” error when trying to upload your files to the server. Or, perhaps you updated Filezilla to version 3.11.0 (or above) and it stopped working, giving you the same ENETUNREACH error.

This is a known issue between Filezilla and Kaspersky. It happens because of the new way Filezilla binds IP addresses to prevent data connection stealing. You can read about the details in this forum post.
You can fix this issue by either reverting back to an earlier version of Filezilla (version 3.10) or by adding an exclusion to the Kaspersky firewall.

Follow these directions to add an exclusion for Filezilla:

  1. Open the Kaspersky application window (by clicking the Kaspersky icon in the notification area or through the Start menu)
  2. Click on the Settings tab
  3. On the left column, click the Anti-Virus protection category to expand it
  4. Click the Firewall item
  5. Click the Application Network rules… button to open the “Firewall” window
  6. Locate the “FILEZILLA PROJECT” folder (it should be under the “Trusted” folder) and click the plus (+) sign next to it to expand the folder
  7. Click on filezilla.exe
  8. On the lower split window, click the Additional… button to open the “Application control rules” window
  9. Click the Exclusions tab
  10. Check the box for “Do not inherit restrictions of the parent process (application)”
  11. Check the box for “Do not scan network traffic”
  12. Click OK on the “Application control rules” window
  13. Click OK on the “Firewall” window

You should be able to connect to the server with Filezilla now.

Of course, there are lots of other reasons why you may get an FTP error. If you do, we offer free (and excellent) technical support for our customers. You can always reach our Support team 24/7 at support@winhost.com or through our support portal at support.winhost.com.

Ready or Not, It’s Time to Consider HTTPS

$
0
0

It used to be that unless your site accepted payments for products or services, you didn’t really need to concern yourself with an SSL certificate, which allows you to encrypt and secure your site traffic using the https protocol. Those days are quickly coming to an end as web security becomes a larger issue, and giants like Google are making an aggressive push to encrypt all web traffic.

Maybe you have even already received a warning email from Google: “Beginning in January 2017, Chrome (version 56 and later) will mark pages that collect passwords or credit card details as ‘Not Secure’ unless the pages are served over HTTPS.” But what does that mean?

Right now (December, 2016) Chrome shows an “information” icon on all non-https pages (Firefox also uses a similar icon):

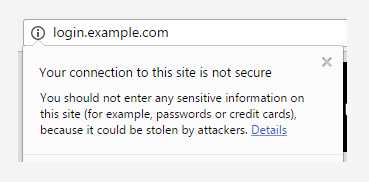
Which seems pretty benign, unless you click that icon and get the insecure site warning:

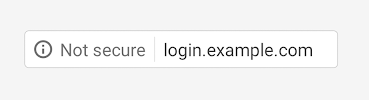
Starting in January of 2017 Chrome is going to take that a step further and add a text warning:

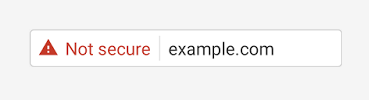
Then “eventually” – which, knowing Google, could be any time  – they are going to throw the red flag at non-https pages:

At the moment those warnings only apply to http pages containing password or credit card input fields, but Google definitely plans to extend the Chrome warnings to all http pages, regardless of whether they accept user credit card or authentication input.

Why is https important?

Using https encrypts connections to prevent anyone from tapping in to the communication between your website and your visitor’s browsers. It also prevents the bad guys from exploiting your site by injecting malicious code or unwanted advertising into your user’s browser.

The https connection lets your visitors know that they’re securely connected to your site. That what they’re seeing is legitimate information. It also prevents anyone from accumulating of a lot of user data or behavior related to your site traffic. Aggregate data like that can be used for a number of malicious purposes, so blocking access to it is a good thing.

How does it benefit me?

Right about now you may be thinking, “Okay, I get it, but I’m not really concerned about someone listening in to my site traffic.” That’s understandable. Most sites run a pretty low risk of being targeted in that way. But you probably don’t want to see every page of your site displaying a red “Not secure” warning in Chrome (and eventually in other browsers as well).

That’s reason enough to take steps now to make every page of your site available via https (and redirect http requests to https). You might even consider it a priority, since the Chrome browser currently has a 56% market share, and that percentage is increasing.

But aside from avoiding the warning label, there can be other benefits to using https. In their own words:

“Google uses HTTPS as a positive ranking signal. This signal is one amongst many others, and currently carries less weight than high-quality site content; you should not expect a major SEO advantage for moving to HTTPS in the short term. In the longer term, Google may increase the strength of the HTTPS boost.”

Google is making it pretty clear that in the future they are going to give an edge in search result rankings to sites that use https. And who doesn’t want an edge where that’s concerned?

How to make the move to https

The good news is it isn’t exactly a “move.” Your site stays on the same server, you just add an SSL certificate to your account and make the necessary changes to redirect http traffic to https. This article is already pretty long, so we won’t do a tutorial here, but other than redirecting to https, there are a few other things you’ll want to watch out for:

  • If your pages call images or include scripts that are not from an https source, you’ll get mixed content warnings. Update all of your pages to use https:// or // references.
  • If you use a CDN, make sure you’re calling the files via an https URL (most CDNs offer both http and https).
  • If you’re using a database-driven app like WordPress, make sure to update all of the http URLs in the database. There are some good “find and replace” plugins that can help with that.

If you use Google Webmaster Tools, after you’ve made the switch, add the https version of your URL as a new property, set the “preferred version” of that property to https and (re)submit your sitemap. Here’s a Google-centric FAQ on transitioning to https that you may also want to take a look at.

Finally, you may have heard that you can get a free SSL certificate from Let’s Encrypt. That’s true, and you can use those certs here at Winhost. But the Let’s Encrypt certificates come with some drawbacks. Make sure you’re aware of what’s involved in using such a cert before you commit to one.

We’ll have more information on this subject in the coming months. We expect that there will be a lot of questions when Google makes the changes to Chrome, and we’ll do our best to address those questions here and in our Knowledge Base.

Email change related to the postmaster@ address for your domain

$
0
0

We’re rolling out a change to the email system that you should be aware of.

The “postmaster” account is set up by default when we establish email service for a domain, but you have the ability to delete that account. The problem with deleting postmaster@ is that some important messages can be addressed to that address, and that’s because the SMTP RFP says the postmaster account for a domain is required to accept mail.

The change we’ve made is implementing behind-the-scenes forwarding that makes your primary domain admin the “postmaster” account (assuming you have deleted the postmaster@ account – if you have not deleted that account, you won’t see any changes). What that effectively does is ensure that email addressed to the postmaster@ address for your domain is delivered.

The side effect of this change is that you may see an increase in spam on your primary domain admin account, since spammers sometimes send to postmaster@, assuming that it exists on every domain (because they know that it’s supposed to exist).

A possible increase in spam is an unfortunate side effect of this change, but the alternative is the possibility of missing legitimate email addressed to your postmaster@ address. Those legitimate messages can be important, so we had to weigh the value of those important messages against the possibility of an increase in spam.

It’s worth noting though that we made this change on a small group of servers a couple of weeks ago, and we didn’t receive any feedback regarding an increase in spam, so the likelihood is you won’t notice much of a change with this new configuration.

As always, if you have any questions or concerns, open up a support ticket and let us know.

iPhone Secure Email Setup

$
0
0

We support secure SSL/TLS connections to our email server. We’re going to show you how to setup a secure connection with your iPhone.

  • Click on the Home button
  • Go to Settings
  • Click on Mail
  • Click on Accounts
  • Click Add Account
  • Choose Other
  • Click Add Mail Account
  • Enter your name, email address, password and description of the profile
  • Click Next
  • Select IMAP

For the “Incoming mail server”, enter:

  • Host Name: mail.HostingAccountDomain.com (replace HostingAccountDomain.com with your email domain)
  • User Name: enter the full email address of the email account you are accessing
  • Password: enter the password for that email account

For the “Outgoing mail server (SMTP)”, enter:

  • Host Name: mail.HostingAccountDomain.com (replace HostingAccountDomain.com with your email domain)
  • User Name: enter the full email address of the email account you are accessing
  • Password: enter the password for that email account
  • Click Next

You will get a certificate warning about the server identity. We installed an SSL certificate on our email server for the convenience and security of our customers. But the problem is that we can’t install a certificate for every customer domain on the server. Instead, we installed a certificate for *.internetmailservice.net. The iPhone will display the warning because of the domain name mismatch; you are trying to reach mail.HostingAccountDomain.com, but the SSL certificate was issued to *.internetmailserver.net. The certificate we installed is safe to use.

  • Click Continue (to accept the certificate)
  • Click Save

Your iPhone may set the default SMTP port to 25. Many internet service providers block port 25, so you should change the SMTP port to 587.

  • Go to Settings
  • Click Mail
  • Click Accounts
  • Click on the account you just created
  • Click Account
  • Click SMTP
  • Click on mail.HostingAccountDomain.com
  • Change the Server Port to: 587
  • Click Done

You’re all set! Now your iPhone now has secured, encrypted communication with our email server.

Deploying an ASP.NET Core 2.0 (Orchard Core) Site on Winhost

$
0
0

The great thing about ASP.NET Core is that it’s portable, allowing you to run your Core application on any OWIN-compatible server. So, even if a particular version of .NET Core is not installed on the server, you can still deploy your Core app in “self-contained” mode.

In this example, we’re going to use the Orchard Core application. Orchard Core is a re-write of the original Orchard application (the thing that runs all the MSDN blogs) in ASP.NET Core. As of the time of this writing, Orchard Core is using ASP.NET Core 2.0. And, at the time of this writing, we have not yet updated our servers with the newest .NET Core to support ASP.NET Core 2.0 natively, but, to repeat: you can still deploy your Core app in “self-contained” mode.

First, some house-keeping. Make sure you have the .NET Core 2.0 SDK installed and Visual Studio is updated.

Orchard Core supports different databases, SQL, SQLite, MySQL and Postgres. I’m going to use SQL, which is included with all Winhost plans. This is a good time to create the SQL database in your Winhost control panel.

Onto the instructions:

  1. Download the Master Branch of Orchard Core from GitHub.
  2. Unzip the file and open the OrchardCore.sln solution file in Visual Studio 2017.
  3. Wait for Visual Studio to restore all the Nuget packages.
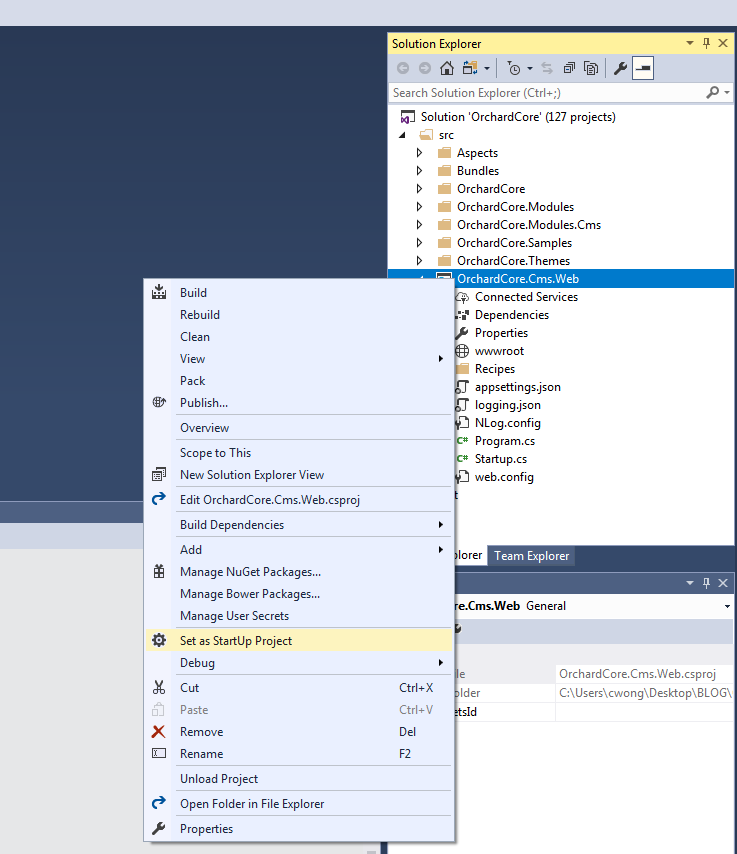
  4. Set OrchardCore.Cms.Web as the startup project (right-click OrchardCore.Cms.Web and select “Set as Startup Project”)

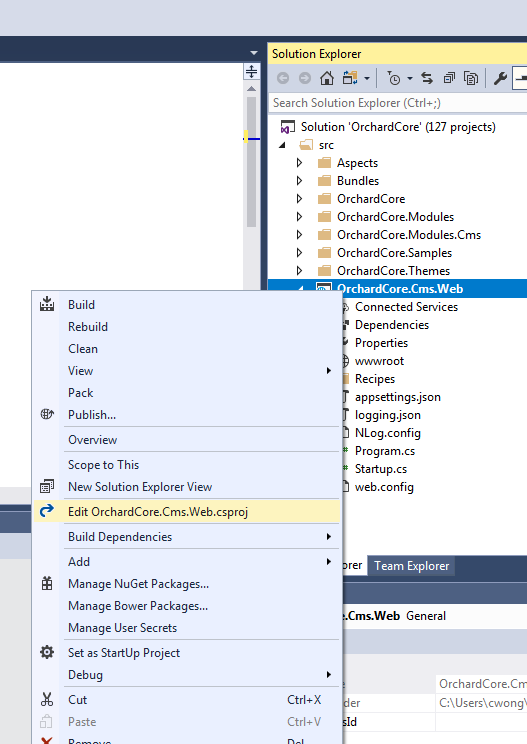
  1. Open the OrchardCore.Cms.Web.csproj project file (right-click OrchardCore.Cms.Web and select “Edit OrcOrchardCore.Cms.Web.csproj”)

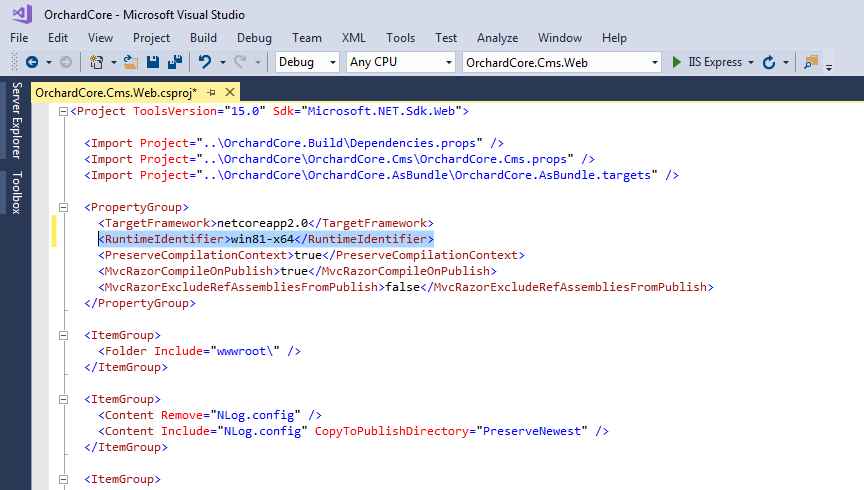
By default, Orchard Core is Framework-dependent. We have to change that to make it self-contained. We have to specify the target platform (tell the application what kind of server it’s going to be running on). In my case, my Winhost site is running on Windows 2012/IIS 8. You can find this information in your Winhost control panel, under the Site Info section. The Runtime Identifier for Windows 2012/IIS 8 is: win8-x64.  If you’re site is running on a different server, you can check out the full catalog of Runtime Identifiers here.

  1. In the PropertyGroup section, add:
    <RuntimeIdentifier>win8-x64</RuntimeIdentifier>

  1. Save your changes.

Now we’re just about ready to publish.  This would be a good time to remove the parts of Orchard Core that you’re not going to use. (For this example site, I didn’t remove anything.)

Before, pre-2.0, we would have run the dotnet restore and dotnet build commands at this point. But now, those are implicit commands with publish. So you can just run the publish command (right-click OrchardCore.Cms.Web and select “Publish…”). I used FTP to publish the project directly onto the Winhost servers. Instructions for different deployment methods are available here.

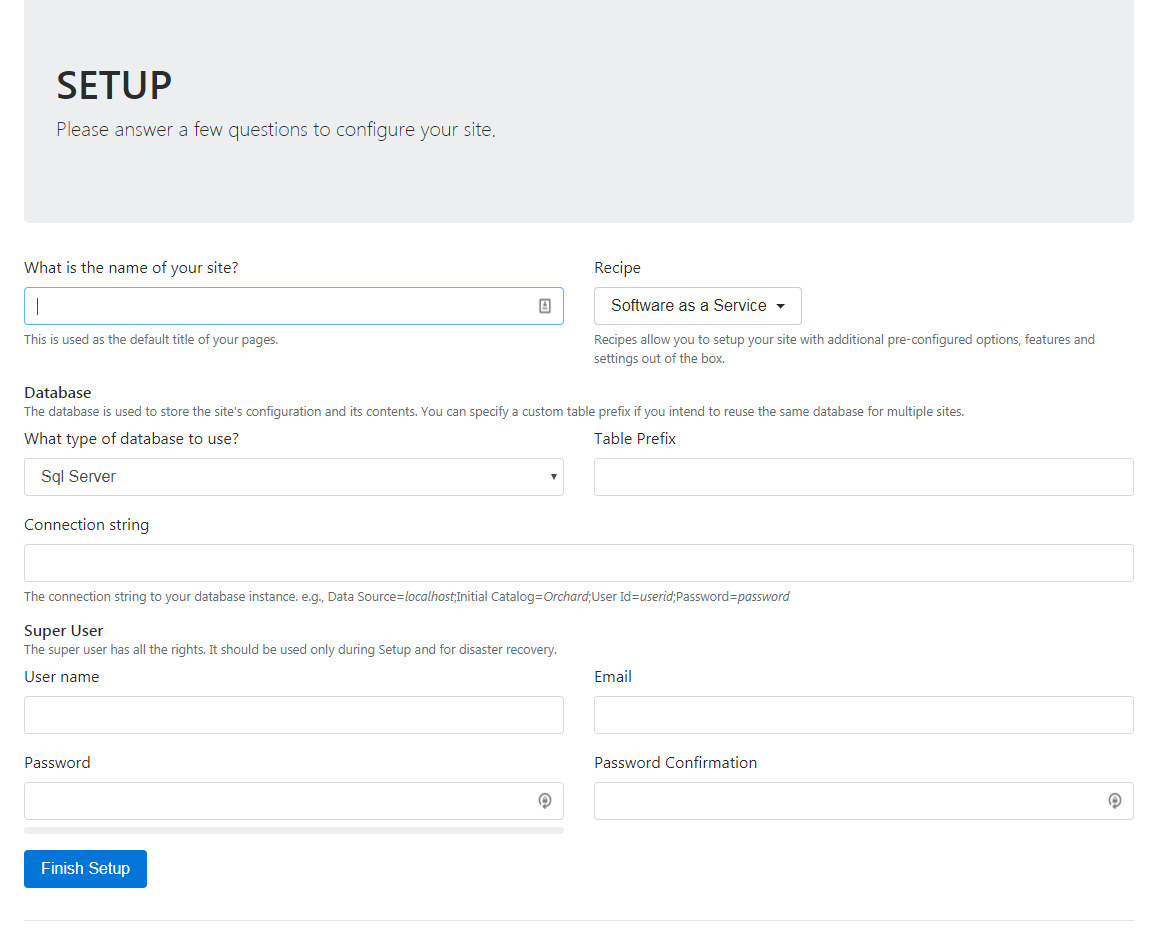
Wait for the project to publish, then navigate to your site and you should see the Orchard Core setup page:

I picked the Agency Recipe. Fill out all the fields, click the Finish Setup button and you should see your new site:

How to Keep WordPress Safe and Secure

$
0
0

This little factoid should freak you out: More than 80,000 websites are hacked every day.

That’s almost one every second, or about 29 million every year. Those numbers translate to a lot of pain and inconvenience for a lot of people. Count yourself lucky if you’ve never been one of them.

There are a quarter of a billion domains with active websites. If 29 million sites are hacked every year, that means we’re living in a world where more than 1 in 10 websites are likely to be compromised. Every year.

How does this happen?

Security starts at home. It’s an old saying, but it applies to a lot of website compromises. We see a lot of hacks that aren’t actually website hacks at all, because the perpetrator is using valid FTP login credentials that were harvested by logging keystrokes or reading log files on a home computer or laptop that has been infected with a virus or malware.

But perhaps the most common way in to a website or server is through old, unpatched third-party software. And a large percentage of that old, unpatched third-party software is WordPress, or WordPress plugins.

Before I give you some tips on locking up your WordPress site, I’d be remiss if I didn’t mention that Winhost has a fully managed WordPress hosting, security and hardening service. The service includes WordPress hardening for maximum security, WordPress-specific support and personalized assistance, and maybe most importantly, monthly updates of WordPress core, Plugins and Themes. The monthly updates consist of one of our in-house WordPress security experts personally examining your WordPress installation for malicious files and signs of compromise. If we discover that your WordPress installation is compromised or hacked, we’ll clean up the mess.

Okay, that’s it for the sales pitch. But if you’ve ever had to clean up a WordPress compromise, I’m pretty sure that you’ll be able to see the value in that service.

Locking down WordPress

The first step in WordPress security doesn’t have anything to do with WordPress itself, but rather site backups. If you always have a current backup, it’s much easier to bounce back from a compromise. Simply identify your most recent “clean” backup, delete everything on your site and upload the clean backup.

We do periodic backups of our entire network for disaster recovery purposes, so if you are compromised you could just request a backup from us. The problem with that approach is we back up every day, and we only retain one copy of those backups. So if you don’t notice that your site has been compromised for a few days, our backup will likely be a copy of the compromised site. That’s not going to be of much help.

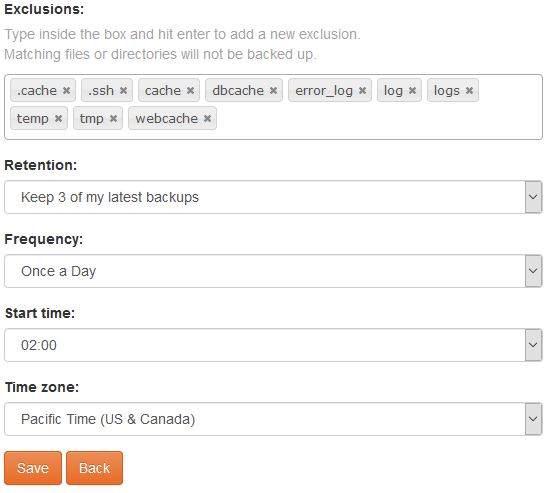
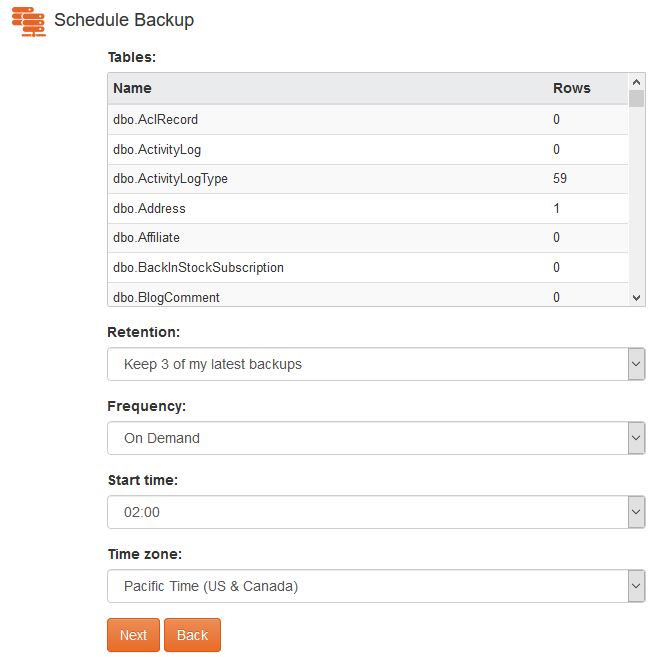
So we recommend a cloud backup service. There are a lot of them out there, or you can set one up from your Winhost Control Panel with a few clicks. Our SiteBackup service backs up your website files and databases on a schedule that you choose, retaining as many versions of the backup as you want to keep.

Okay, so that’s a good place to start, with a daily backup of your WordPress site and database. Next are a number of things that you should do to prevent a compromise of your WordPress site.

Update, update, update
How often do you log in to the admin section of your WordPress site? If it’s less than every week – or even every month – you need to start checking in more regularly and updating both the core WordPress files and all of your plugins. If you use a plugin and can’t remember ever updating it, check out the plugin’s page on WordPress.org and make sure it hasn’t been abandoned. If it seems like it has, uninstall it. Chances are there’s a well-maintained plugin out there that will do the same thing.

Kill the admin user
If you installed WordPress some time ago, it may have created a user named “admin” by default. Most brute-force WordPress hacks attempts are on the “admin” username, so you don’t want it to be there. To check, go to your Users page (/wp-admin/users.php) and see if admin is listed there. If it is, create another user or give another existing user the administrator role and delete the default admin user.

Don’t use the default WordPress MySQL table prefix
If the bad guys do manage to find a vulnerability within your site and one of their attempts is to query a table or insert into a table and you used the default table prefix, you could be in trouble. When you’re installing WordPress it’s best to change the table prefix from the default “wp_” to something different. One easy way to do that is to insert random characters after “wp_” – for example wp1od02l_ or wp5434fs_.

Change the WordPress login error
By default, WordPress gives hints about your login when a login fails. One of the steps in our hardening service is to change the login error to “You have entered the wrong Username or Password!” That way someone trying to compromise your site will never know if the username or password is incorrect, making it much more difficult to force or guess a login.

Remove the WordPress version information
It really helps the bad guys to know which WordPress version you’re using. Once they know the version, they can try known vulnerabilities giving them a better chance of getting into your site. They’ll also use Google to find WordPress blogs running a specific version of WordPress that’s easily hackable. You can use a plugin to remove version information.

Disabling Theme and Plugin Editing
The theme editor within WordPress is there to allow you to make quick changes to the code within a theme’s files. Chances are you won’t ever use that feature, but you can be pretty sure that the bad guys will make use of it to enter malicious code. In fact, that is how a lot of WordPress sites get hacked. To prevent that, enter the following rule in your Wp-config.php file, right before the “Stop Editing” tag:

/** Disable File Theme and Plugin Editing */
define('DISALLOW_FILE_EDIT', true);

What else?
The Winhost hosting environment goes the extra mile by disabling executable files from running within the uploads folder, as well as IP restriction of the wp-admin directory. That way the wp-admin directory can only be accessed from IP addresses you specify.

Last but not least, install a Security plugin
If you haven’t already done so, we would highly recommend installing one of the WordPress security plugins. As part of our hardening service we make the security plugin a “Must Use” plugin. That means the plugin can’t be disabled from the admin section of WordPress. The only way to disable it is by deleting the plugin via FTP.

That’s a lot to install, configure and keep track of, but following these recommendations will make your WordPress installation much less susceptible to compromise. If it all sounds good but you don’t really have the time or inclination to do it yourself, let us do it for you.

How SSL certificates work

$
0
0

SSL certificates are necessary if you do credit card transactions on your site, or if you simply want to make your site available via an HTTPS URL (such as: https://example.com). If you visit that URL without the HTTPS prefix, you’ll notice that there’s no security “lock” displayed in your browser. That lock icon means your connection to a site is encrypted.

If you’ve never cared about HTTPS, it’s probably time to start. The days when you could avoid using HTTPS are rapidly coming to an end, and Google and the other big web browser makers are more or less forcing the change on everyone. So it’s a change we’re all going to have to make, or one day in the not-too-distant future, security warnings could be greeting every visitor who loads our sites.

With that in mind, here’s a high level overview of what SSL is and how it’s implemented. Think of it as an introduction to the concepts and a peek at the inner workings for anyone who is new to the subject.

Technical note: modern web servers don’t really use the SSL (Secure Socket Layer) protocol anymore, but the name has stuck to the certificates as kind of a generic identifier, so we use “SSL” in this article. The TLS (Transport Layer Security) protocol has replaced SSL for most uses. We’re also using the example of a web browser connecting to a web server, but the concept is the same no matter what kind of client is making a secure connection to a server.

What is an SSL certificate?

An SSL certificate is really just a text file that is installed on the web server. It ensures that the domain name in the certificate matches the domain name of the site, and enables a visitor’s browser to make a secure connection to the site, so that the traffic back and forth is encrypted and no third-party can listen in on the conversation.

The reason for encrypting transferred data may be obvious where financial transactions are concerned, but even if you’re not sending financial data across the web, quite a bit of private data can be passed between your site and a visitor’s browser (like usernames and passwords). That private data is valuable to unscrupulous types, so encrypting the connection protects the data. Without an SSL certificate and the HTTPS connection, that encryption doesn’t happen.

It’s worth noting here that an HTTPS connection doesn’t prevent someone from finding out which domains you’ve visited. It just makes it (theoretically) impossible for them to see any of the data that was exchanged during the visit.

What’s inside the SSL certificate?

An SSL certificate contains information about your business or organization (or simply you as a person), and a cryptographic key unique to your domain or certificate. That key is used to establish the encrypted connection. Your website presents the key to the visitor’s browser, and if the browser determines the key is valid (more on that in a minute), the encrypted connection is established.

Let’s talk about trust for a minute…

The entire SSL system is based on trust. When the HTTPS protocol was established, everyone agreed to trust certain organizations (and later companies) to issue legitimate certificates. Those organizations and companies are called certificate authorities. The certificate authority verifies who you are when they issue the certificate and the browser trusts the that the certificate authority has done that verification.

You might see a bit of a problem there if you’ve ever requested a “domain validated” SSL certificate and noticed that no one actually checked anything other than the fact that you had an email address on the domain. It wasn’t always that way. In the early days of SSL, the certificate authority did verify that you were who you said you were, and the owner of the domain you were requesting a certificate for. But as you might imagine, that time-consuming kind of validation quickly became impossible, so now that level of manual human validation is only done for expensive “extended validation” certificates.

How does the browser know when to trust an SSL certificate?

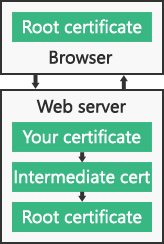
Every certificate authority issues a “root certificate,” which is like a master certificate for that authority. If the authority operates under different names or resells certificates through other companies, they issue “intermediate certificates” that are related or connected to the root certificate. Then the certificate for your domain is associated with the intermediate or root certificate, and that makes up a certificate chain. So the browser trusts the certificate for your domain because it’s associated with a root certificate.

Your certificate, any intermediate certificates and the root certificate are all installed on the web server. The same root certificates are also pre-installed in web browsers and many computer operating systems, so the browser can validate the root certificate on the web server. There are actually a few checks and validations that take place between the different certificates, but her’s a simplified diagram of the chain:

The connection is trusted if:

  • The root certificate for your site matches the pre-installed root certificate in the browser (or the broswer’s O/S).
  • None of the certificates in the chain on the server are invalid, expired or revoked.
  • The domain name in your certificate matches the domain name in the URL.

How does SSL work?

It’s pretty easy to get lost in the tall weeds here, because the underlying system that handles HTTPS encryption between a client (browser) and a server (your site) is quite complicated (and to add to the complication, the system is always changing, as better and stronger encryption methods are introduced).

But in a nutshell:

– The browser makes a TCP (standard Internet) connection to the site on the web server.

– The browser starts an SSL “handshake,” which is a transfer of data to the server about which version of SSL/TLS the browser is running, and which encryption methods it wants to use.

– The web server determines the highest SSL/TLS version that is supported by both the server and the browser, then sends its certificate(s) to the browser.

– If the certificate(s) meet all the criteria described above (in the “connection is trusted if” section), a cryptographic key is then exchanged and the browser tells the server that all further communication will be encrypted, and sends an encrypted authentication message to the server.

– The server verifies that the message is correct, then returns a similar message that the browser verifies.

– That’s the end of the “handshake,” and until it is broken, the browser and server can communicate securely.

Luckily all of those steps typically take place in a fraction of a second, and the browser and web serer don’t have to do them again (unless the secure connection is broken).

Well, that’s a lot of words for a “simplified” explanation, isn’t it. Sorry about that. But hopefully this has helped you to better understand what an SSL certificate is and what it does.


Still curious about SSL/HTTPS? Check out these other articles:

Ready or Not, It’s Time to Consider HTTPS
Let’s (not) Encrypt. But let’s not ignore https either.
How to Secure Your Primary Domain for Free When Ordering an SSL Certificate
Google Chrome, SSL certificates, SHA-1, SHA-2 and the “obsolete cryptography” message


Configuring Elmah for use with ASP.NET Core

$
0
0

howto

Years ago, I wrote an article on how to configure Elmah to be used on Winhost.  You may have noticed that there is no official support for ASP.NET Core, however, you can use ElmahCore by barestan to perform the same logging to a database, and this blog provides an example on how to set that up.

First, we’ll start by creating a New Project in Visual Studio:

  • Go to File -> New Project… (Ctrl-Shift-N).
  • Select Visual C# -> Web -> ASP.NET Core Web Application.
  • Give the project/solution a name and click on OK.
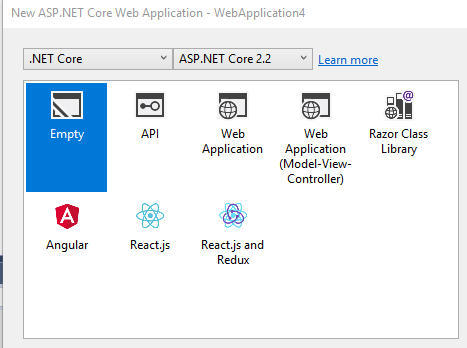
  • Select .NET Core in the left drop-down menu and ASP.NET Core 2.1 in the right drop-down menu. You can also just use the Empty project template.
  • Click on OK.


  • Now from the main menu up top, select Tools -> NuGet Package Manager -> Manage NuGet Packages for Solution…
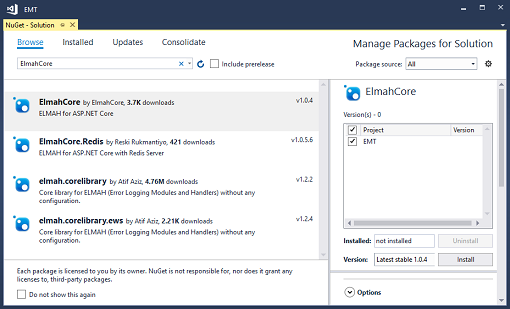
  • Click on Browse in the NuGet – Solution window and type in ElmahCore.
  • Highlight ElmahCore, check the box next to your project, and click on the Install button. Accept any license agreements and complete the installation.


  • Now double click the Startup.cs file in the Solution Explorer window to open it.
  • Add a using ElmahCore; directive at the top.
  • In the ConfigureServices method, add the following code replacing connection_string with your actual Winhost database connection string. Make sure you’ve created the database and installed the Elmah tables as outlined in my instructions from my previous blog.
services.AddElmah<SqlErrorLog>(options =>
{
    options.ConnectionString = @"connection_string";
});
  • In the Configure method, add the following code:
app.UseElmah();

That’s it.  If you want to know if it’s working, you can generate a sample exception like this:

app.Run(async (context) =>
{                
    await context.Response.WriteAsync("Hello World!");
    int[] numbers = new int[5];
    await context.Response.WriteAsync(numbers[6].ToString());
});

That will generate an “Index was outside the bounds of the array.” exception which will be logged into the database.  You can query the dbo.ELMAH_Error table to see the results.

Blocking access to files with IIS Manager

$
0
0

Some customers have asked what is the best way to prevent visitors from accessing certain files on their sites. The solution we generally recommend is what I am going to cover in this article.

First you will need to connect to your site through IIS Manager and the instructions can be found here: https://support.winhost.com/kb/a628/using-the-microsoft-iis-manager.aspx

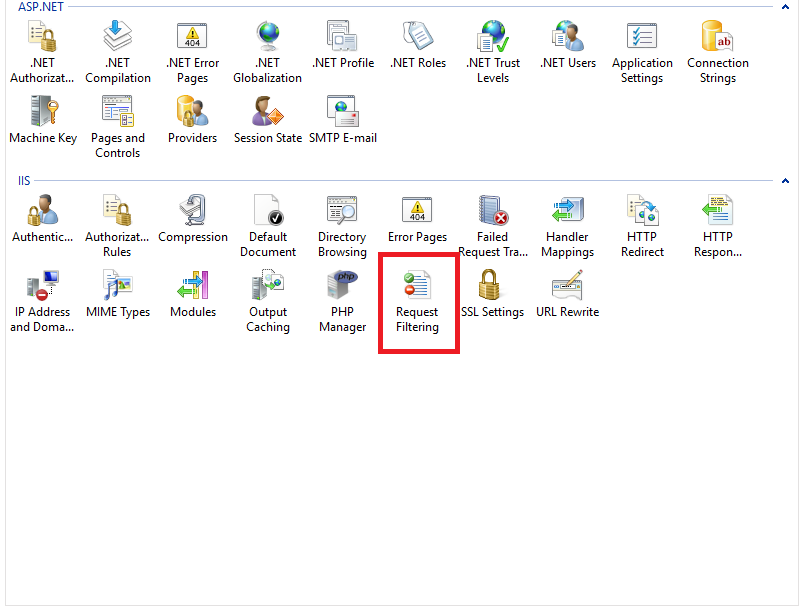
Once you have made a successful connection you should get a screen that looks like the one below:

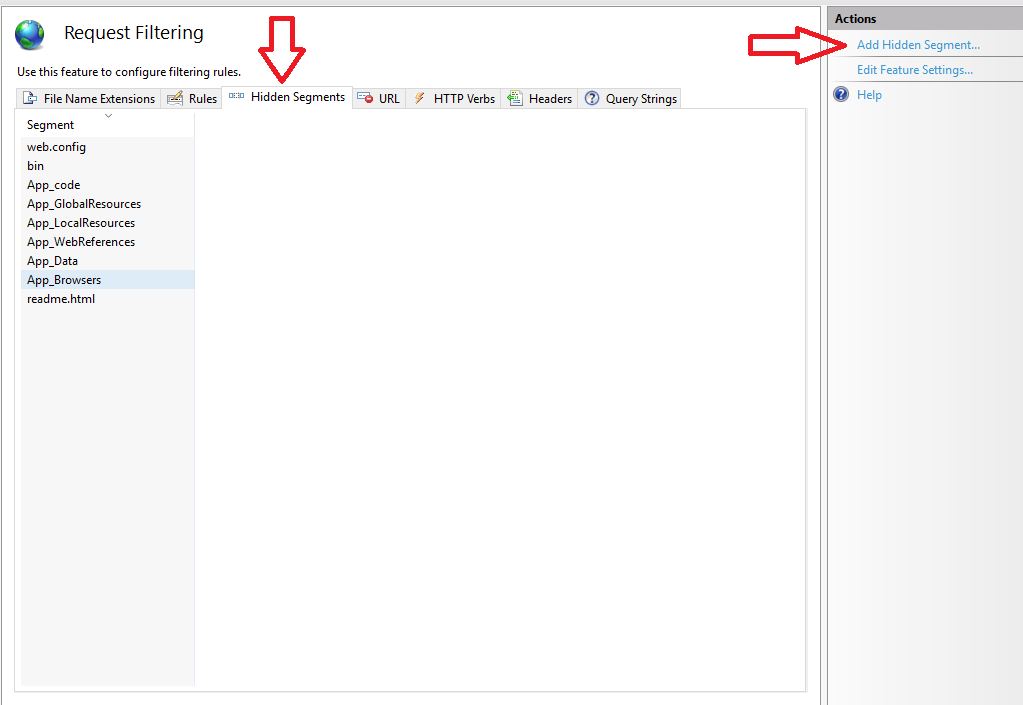
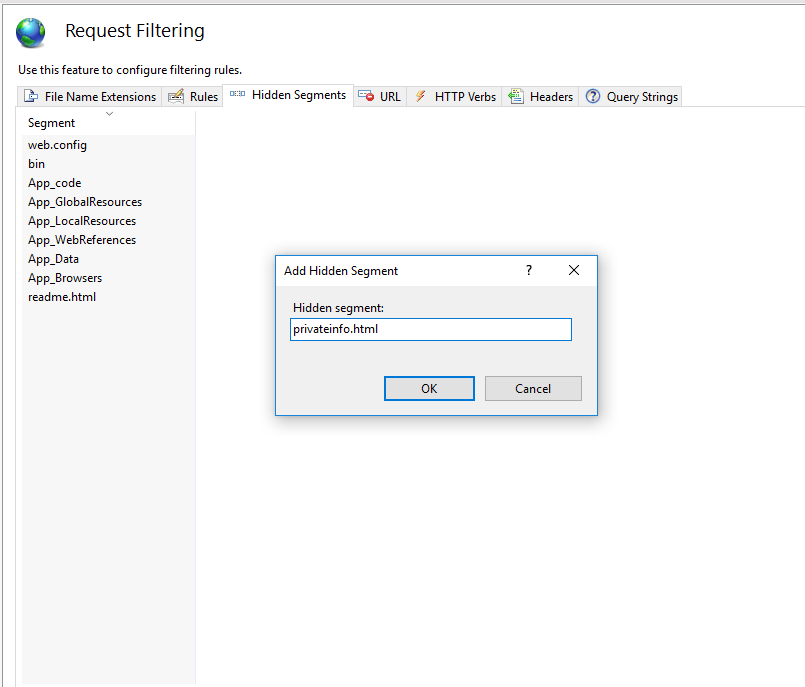
Double click on the highlighted (red box) “Request Filtering” option. On the next screen, navigate to the “Hidden Segments” tab.

This screen will probably list some default files that are blocked. We will add the file from our site that we don’t want visitors to access. To do this, click on “Add Hidden Segment” and type in the filename you want to deny access.

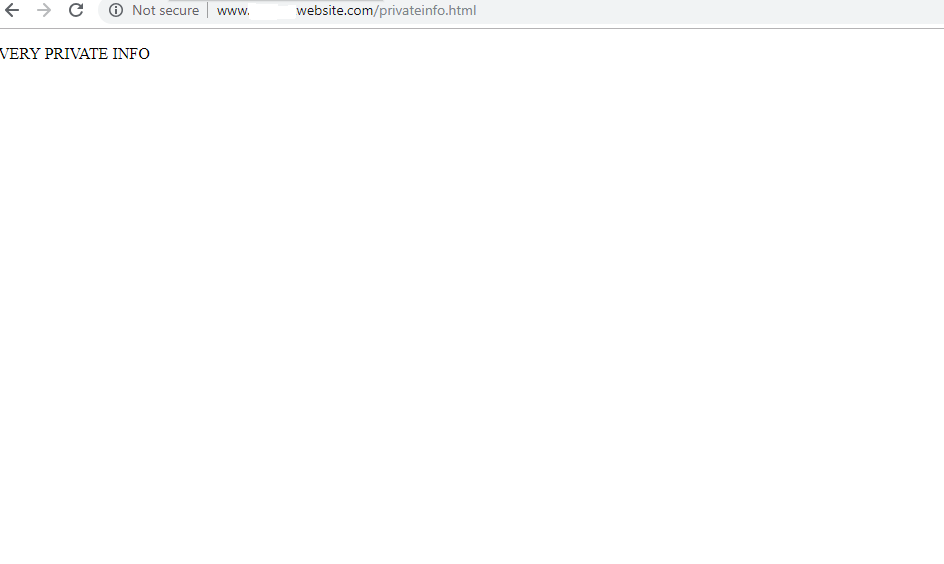
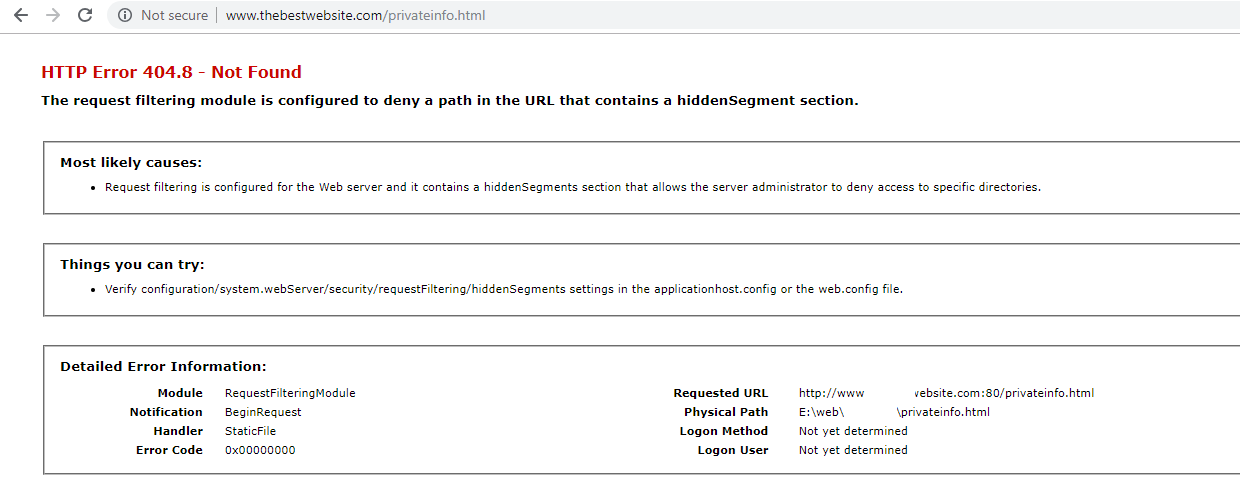
And that’s all there is to it. Now when someone tries to navigate to that file they will get the error demonstrated below.

Before:

After:

This is how the rule appears in your web.config after created.

<?xml version="1.0" encoding="UTF-8"?>
<configuration>
  <system.webServer>
    <security>
       <requestFiltering>
          <hiddenSegments>
             <add segment="readme.html" />
             <add segment="privateinfo.html" />
          </hiddenSegments>
       </requestFiltering>
    </security>
  </system.webServer>
</configuration>

I hope this helps you protect your site.

Visit Winhost to learn more about our IIS hosting solution

How to deploy an InProcess ASP.NET Core 2.2 application

$
0
0

In this tutorial we’ll be using an empty ASP.NET Core application within Visual Studio 2017 and show you how to deploy an ASP.NET Core 2.2 application that is running in InProcess on a Windows IIS Server.

Some information before we get started.

ASP.NET Core 2.2 was recently released and with some new cool features. You are now able to use InProcess with your ASP.NET Core application. By default older versions of ASP.NET Core used OutOfProcess. When using InProcess the ASP.NET Core application only uses the IIS Worker process (w3wp.exe) whereas the OutOfProcess Core application uses the Kestrel server along with the IIS Worker process.

Kestrel is used in ASP.NET Core because it’s supported on different web servers like Apache, IIS, and Nginx. In a Windows server environment, OutOfProcess uses the Kestrel process (dotnet.exe) and IIS Worker process as a reverse proxy to handle the HTTP requests and other various requests normally handled by the IIS Worker Process.

When using InProcess hosting the IIS worker process handles all of the HTTP requests without Kestrel. No more reverse proxies being utilized meaning for a quicker result and a boost in performance.

On Winhost we support both InProcess hosting and OutOfProcess hosting with ASP.NET Core 2.2. If you want to test this on Winhost try to find our hidden promo code within this blog post. (Hint: It’s not a clickable link.)

Let’s get started.

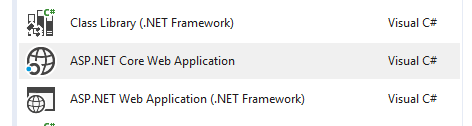
Open a new Visual Studio Project as shown below:

Select ASP.NET Core Web Application.

Click OK and on the next window select Empty making sure ASP.NET Core 2.2 is selected from the drop down menu as well. Click Okay again.

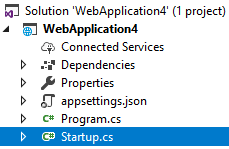
In this project we’re only interested to focus on what process the ASP.NET Core 2.2 is running on. To do this we need to edit the Startup.cs file from the Solution Explorer page.

Go to Line 30 and replace the following code:

await context.Response.WriteAsync("Hello World!");

With the following:

await context.Response.WriteAsync(System.Diagnostics.Process.GetCurrentProcess().ProcessName);

The above code replaces the typical “Hello World!” text from the empty application and displays the process name the application is running on. This step isn’t necessary if you want your application to use InProcess hosting model. We are doing this here just to see what process is being used once it’s been deployed onto the web server.

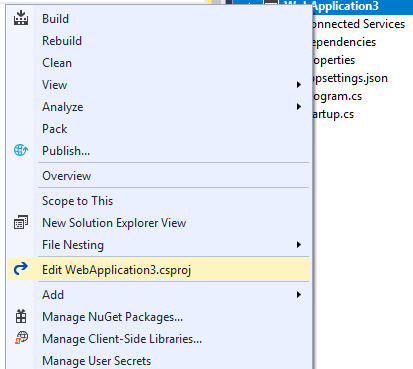
When selecting a new ASP.NET Core 2.2 project in Visual Studio 2017 the defaults to InProcess within the Application’s Project file. However, you have the ability to check what hosting model your core application is going to use by checking the Project file. See below example:

In the project file on line 5 you should see the following:

<AspNetCoreHostingModel>InProcess</AspNetCoreHostingModel>

Deploying your project to Winhost

Log into your Winhost control panel if you haven’t done so already.

  • Click on Sites tab.
  • Click on your site account.
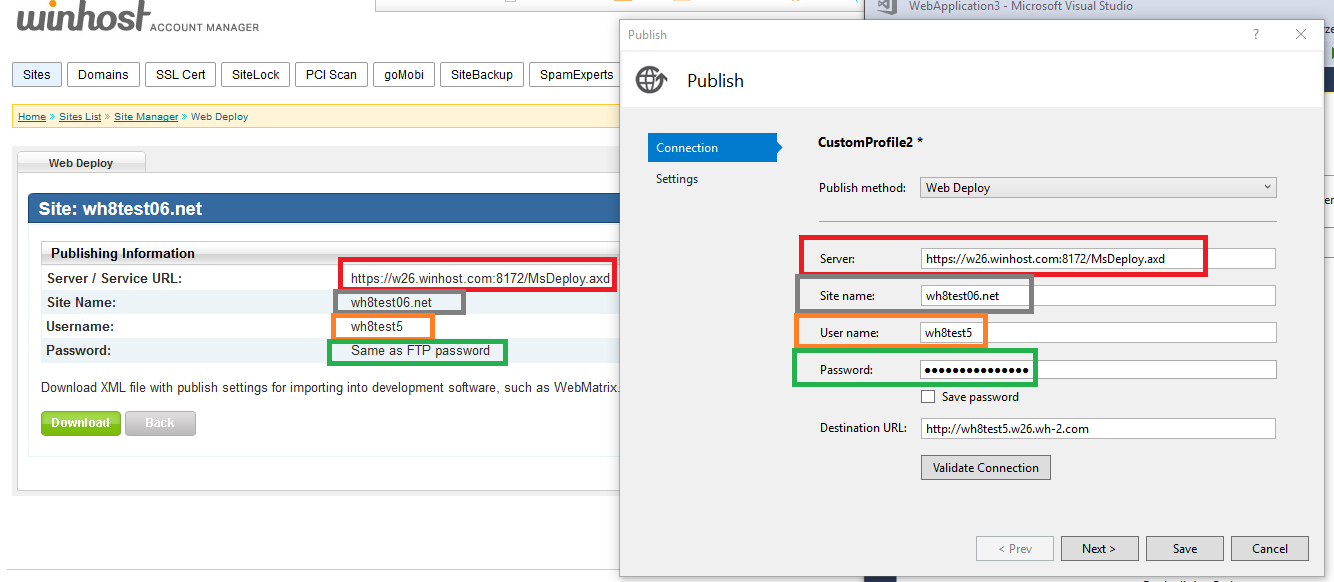
  • Click on Publishing Information link under Site Info section.

In the Publishing information section you will need these settings within Visual Studio when doing a Web Deployment. See below:

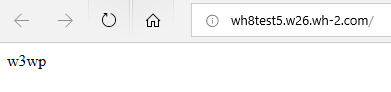
If your application is on a IIS server and it’s running InProcess the text you will see in the web browser is: w3wp

If your Core application is running OutOfProcess then it will return: dotnet

In closing, InProcess according to Microsoft is, quicker compared to OutOfProcess. Nicely done Microsoft… Nicely done, indeed.

Visit Winhost to learn more about our ASP.NET Core hosting solution

My WordPress admin login just keeps refreshing. What to do?

$
0
0

When I see one of these tickets, I know I’m in for the long haul. I’ve seen this problem a handful of times and each time the solution was different and less obvious than it’s predecessor. So instead of struggling to remember what it was I had done the previous time that succeeded , I decided to consolidate some of the fixes into this blog post.

1) Check your database.

In the control panel go to the MySQL icon and look for “Usage”. If you reached the assigned quota for that database, you may have found the issue. You will either have to raise the quota or if you have reached the max quota for the account, then you will have to free up some space. Once you make this change check back in an hour and your login may start working again.

2) Disable Plugins or Themes.

If you recently installed a new plugin or theme when you encounter this login problem, that may be the culprit. Connect to your site via FTP, navigate to the “wp-content folder”, and find your “plugins” folder. Try renaming the “plugins” folder to “pluginszzz” and attempt to log in. If it works, then you know for sure that one of the plugins was interfering with the login.

If the last step did not reveal anything check the “themes” folder by double clicking it. Rename the theme you are currently using to anything so WordPress will revert back to the default theme. If the login is successful then you know the theme was the cause.

3) Define your site URLs in wp-config file.

Connect to the site via FTP. In the root of your WordPress directory look for your “wp-config” file. Download it and open it in a text editor such as Notepad or Notepad++. Add the following two lines to the file, save it, and upload it back to the site.

define(‘WP_HOME’,’http://domain.com’);

define(‘WP_SITEURL’,’http://domain.com’);

***Be sure to change ‘domain.com’ to your actual domain name***

4) Reset your password.

This is a fairly self-explanatory step. Just click on the forgot my password link, reset it and try again.

The above list has been the solutions that worked to resolve the login issue for me, but there could be other resolutions to the login problem that I haven’t encountered yet.

If none of the above successfully resolves your issue, the next step would be to open a technical support ticket so we can try looking into the issue further and find the cause. If we find more solutions we’ll try to post them in the future.

Visit Winhost to learn more about our WordPress hosting solution

How to add reCAPTCHA to your WordPress Site

$
0
0

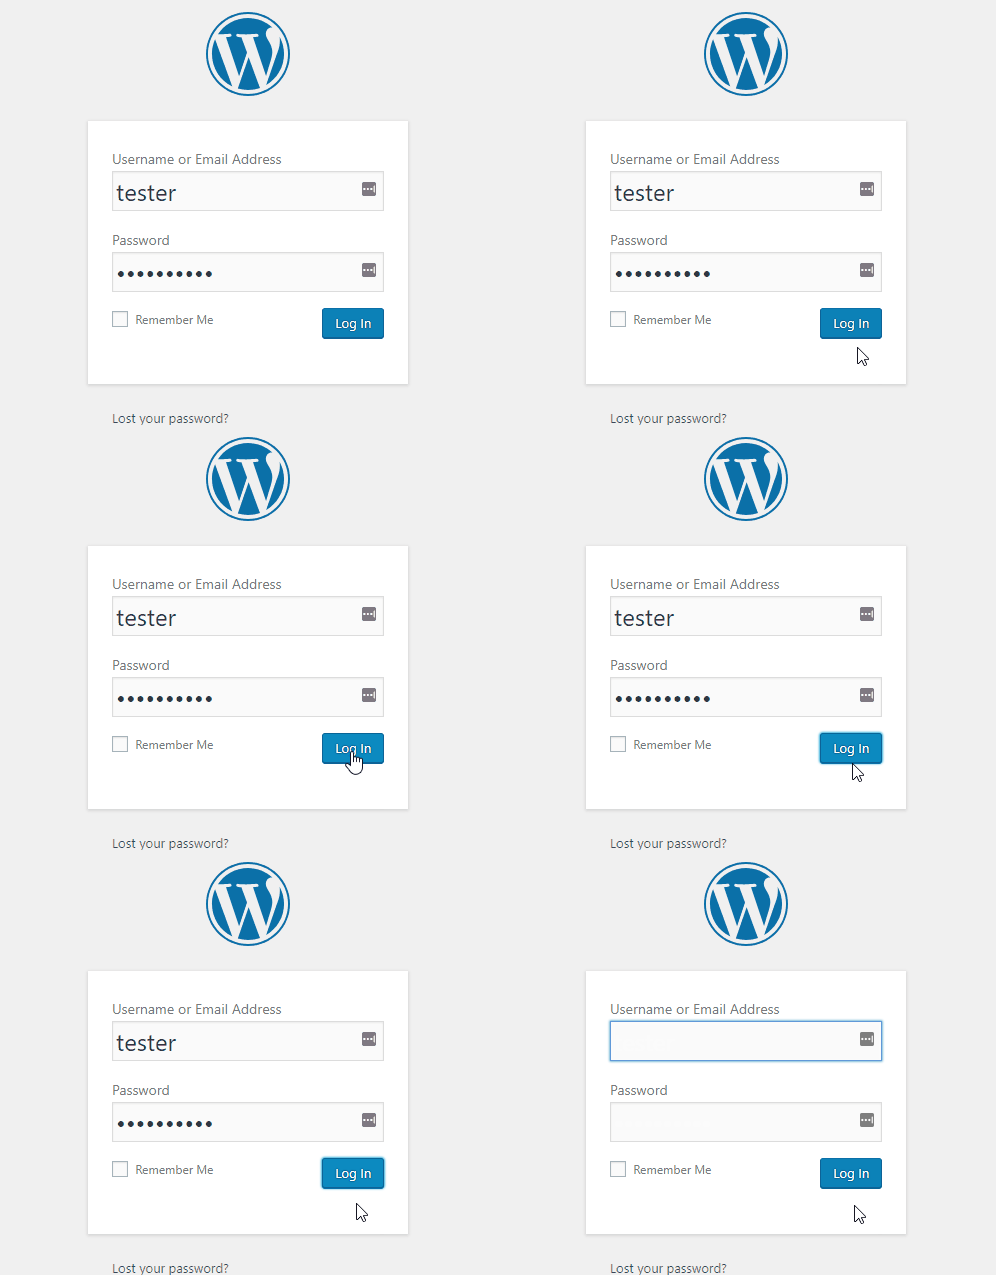
One of the most popular ways attackers are able to compromise WordPress sites is through a brute force attack. Through this method, they can try large number of passwords in a very short time. If your password can be easily guessed, there is a higher chance of an attacker gaining access.

In this post we will be covering how to add reCAPTCHA to your WordPress site. This can effectively shut down bots that are trying to abuse your pages, especially your login page.

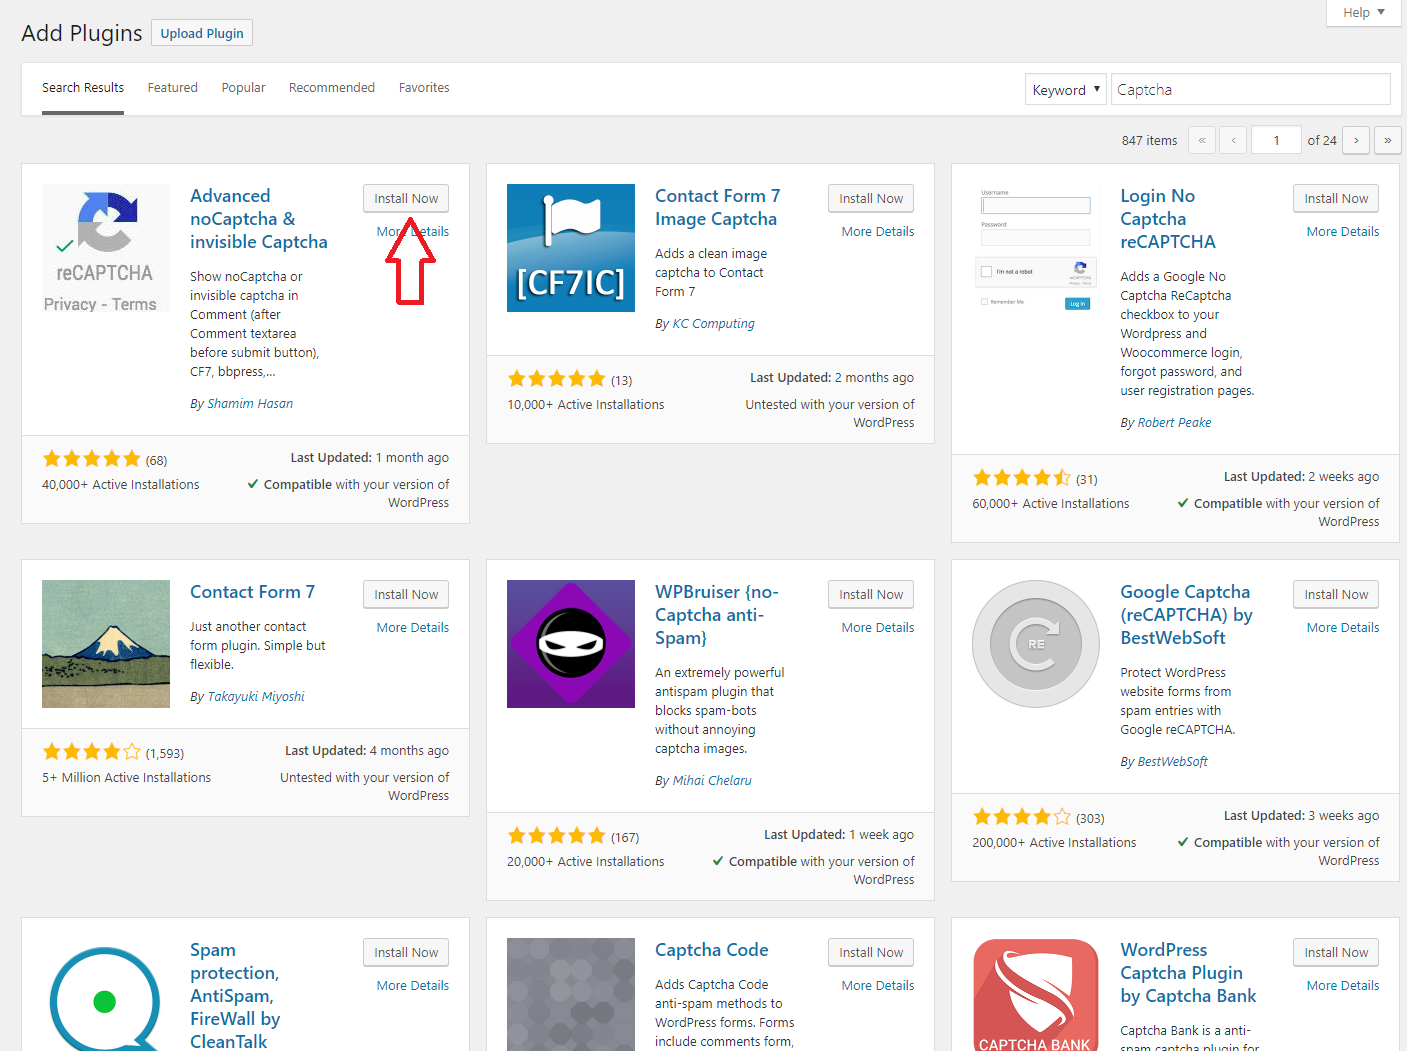
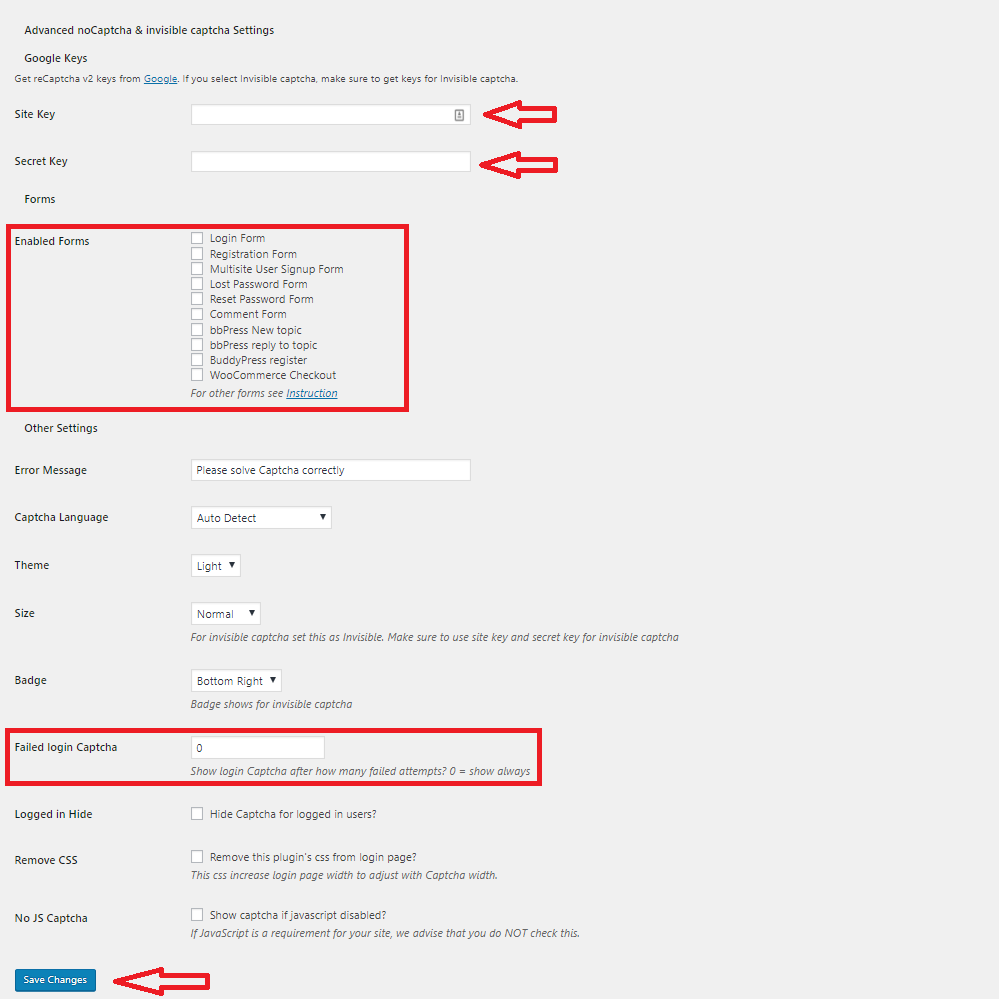
To begin, you will need to log in to your admin section of your WordPress site. Go to Plugins > Add New, on this screen search for “captcha”. The plugin I have used and have not had any problems with is the “Advanced noCaptcha & invisible Captcha” plugin. Click “Install Now” , “Activate”, and then click settings.

For this next step a Google account is required. Go to this link:
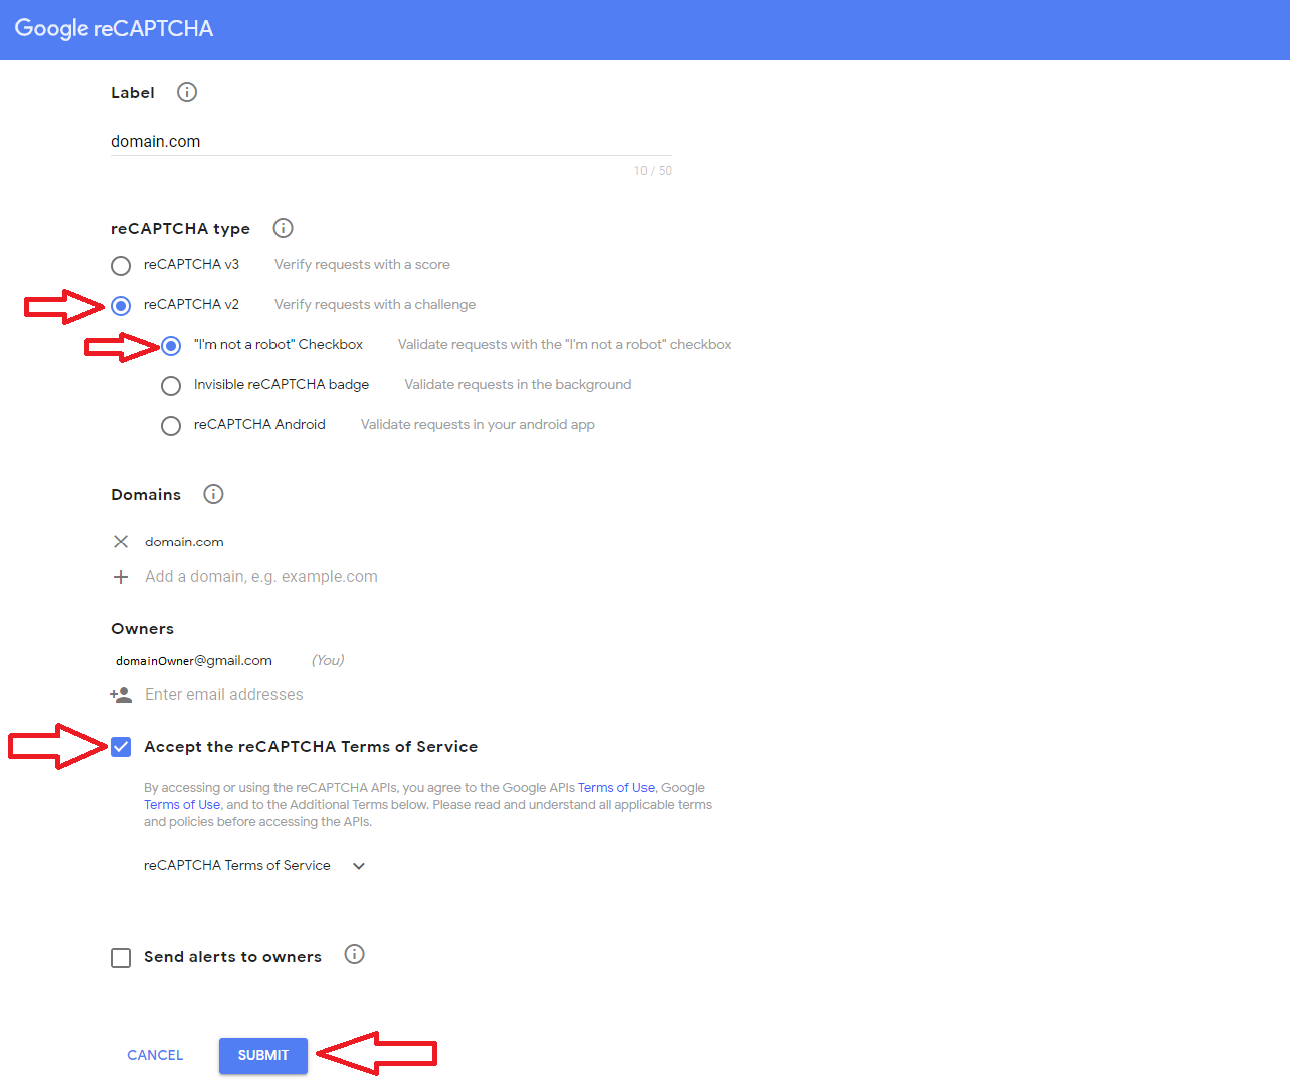
https://www.google.com/recaptcha/intro/v3.html# and click Admin console on the top right. Fill in the label field with your domain name, be sure to choose reCAPTCHA v2, enter your domain, and accept the Terms of Service.

Click submit to be given your “Site Key” and “Secret Key”, go back to the settings page for the plug in and paste the keys in there. Fill in the rest of the fields as needed. **I would highly recommend testing it on only the Comment Form first and not the Login as it can lock you out if done incorrectly. ** You can also set how many attempts are allowed before a user is prompted, the default is set to always ask.

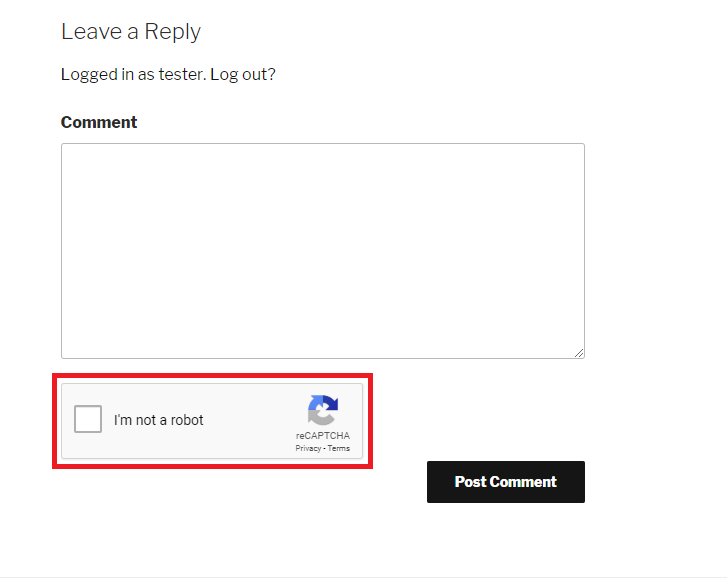
Click “Save Changes”, then visit a comment section on your site. The result should be the newly added reCAPTCHA prompting you to verify you are not a robot.

Congratulations! You can now go back to the settings page and enable it on the log in page, as well as any other pages you would like to protect from bots. Should you encounter any problems during the process please open a support ticket.

Visit Winhost to learn more about our WordPress hosting solution

Why is my email so slow? Check the email header.

$
0
0

Having an email message to take forever to arrive can be very annoying and sometimes it leaves people wondering why is this even happening. In this article I’ll show you how to analyze email headers of an email message.

What is an email header?

An email header is a timeline of where the email message went through to get to you and the different email systems it touched during the delivery process. It’s sort of like looking at the tracking information of your UPS delivery. The only way to find out where the slowness is happening is to review the email header of that sluggish email message.

Where can I find the email header?

First, the email message must arrive at the destination before you can review the headers. We have instructions on how to view email headers in our knowledge base. There are multiple ways of viewing the headers. Here is another list that can help you find your email headers.

How to analyze the email header

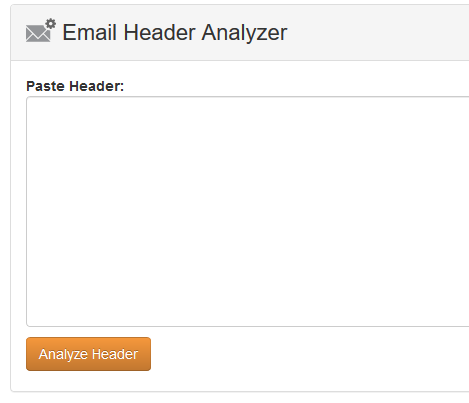
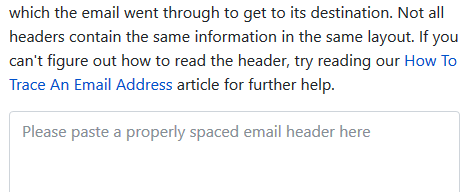
Email headers can look ugly and hard to understand. Luckily there is a email header analyzing tool provided by MxToolBox.com that can help with that.

Copy and paste that ugly looking email header into the empty field and click on Analyze Header.

In the results, the email server with the longest bar graph is going to be the email server that is causing the most delay.

Why is this occurring?

There are many different reasons why an email message could be slow. One common reason is that the email server that caused the most delay had a large amount of email messages to process. If you see that the latency is happening in one of our email servers, we will gladly check our system for you and the logs to see what might be happening. Please contact our support department via our support portal for assistance.

For the most part most email servers are temporarily handling large volume of emails and will go back to normal performance on their own. However, if you’re seeing this issue keeps happening at a particular email server, you can contact the email administrator of that email system and provide them with the email header as proof.

Visit Winhost to learn more about our Windows hosting solution

PHP 7.3 Running Faster on Windows Server

$
0
0

PHP 7.3 that’s been recently installed on all of our IIS 8 and IIS 10 servers. One major difference is the speed of PHP sites running on PHP 7.3. Reading the buzz around the internet you’ll see claims that PHP 7.3 being 31% faster than PHP 7.0 and 3 times faster than PHP5.

Curious about this myself, I decided to check to see how much better the speed was for a based WordPress site running on our Windows 2012 IIS 8 Servers.

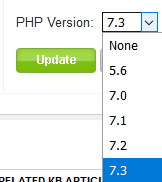
Users can easily change the PHP version of their site account within the Winhost control panel.

Sites > Site Account > PHP Version

I used Google’s PageSpeed Insights Tool to test a website. And sure enough, I got a lot better results while using 7.3. While just using a base WordPress install with the canned plugins it comes shipped with, 7.3 did in fact preform better than PHP 5.6.

Speed Score after using PHP 5.6
Speed Score after using PHP 7.3

Please note that your results will vary depending on how large your site is and what plugins and themes you are using.

If you’re using an older version of WordPress. Please be sure to update to the latest version before changing your PHP version within the control panel. You should also upgrade all plugins and themes your site is using as well. Otherwise, your WordPress site could break until you switch it back to the old PHP version you were using before. Contact our technical support team if you run into any issues.

If you’re still currently on our Windows 2008 IIS 7 servers. You can contact our support department and asked to be migrated to the newer servers.

Visit Winhost to learn more about our Windows hosting plans supporting PHP 7.3.


Programming 101 Tips: 2 Ways to Add a Loading Icon “Spinner” to Your Website

$
0
0

For budding new web developers, here are two ways to add a “spinner” icon to indicate that your website is busy loading data. The first method uses jQuery’s .ajax method and the second method uses Javascript’s new Fetch API. For the spinner icon, we will use an icon from Font Awesome. I prefer this method because it reduces load time. A well crafted css-styled .png/.gif icon would work as well.

First, install Font Awesome by downloading it (you can get the Free for Web version) and then follow the various instructions on their site to add it to your project (look on the right for Using Font Awesome With). Since I am developing with Visual Studio, I just use NuGet’s Package Manager to install it for me. To add it to your web page, add a stylesheet reference in the <head> element. Since I’m using Visual Studio, my reference looks like this:

<link rel="stylesheet" href="/Content/font-awesome.min.css" />


Next, you will also need to install jQuery and add a reference for it as well:

<script src="/Scripts/jquery-3.4.1.min.js"></script>


jQuery can also be installed via NuGet’s Package Manager in Visual Studio.

Now, add the spinner by adding this line to your page in the <body> element:

<div id="Spinner"><i class="fa fa-spinner fa-3x fa-spin"></i></div>


It can be placed anywhere in the <body> element, but I prefer to place it at the top for organization reasons (i.e. easy reference). The <i> element is used to create the font-awesome icon and the “Spinner” id will be used for further styling. Here is the markup for the “Spinner” css:

#Spinner {
    color: blue;
    left: 47%;
    position: fixed;
    top: 47%;
    visibility: hidden;
    z-index: 1;
}


This should place the spinner in the middle of the page and hides it initially until you activate it (i.e. make it visible) via jQuery. The z-index is used to overlay it over a page.

Now, when making your .ajax call, use the following format:

        $.ajax({
            type: "GET", // GET, POST, DELETE, etc.
            url: "https://www.mysite.com/api/dosomething", // some url
            beforeSend: function () {
                $("#Spinner").css("visibility", "visible");
            },
            complete: function () {
                $("#Spinner").css("visibility", "hidden");
            },
            success: function (response) {
                // do something with response data
            }
        });


By changing the value of css property “visibility” using jQuery, you’re turning the spinner on before the ajax call is made and off after it finishes which gives it the illusion that the site is processing data.

If you plan to use Javascript’s new Fetch API, here is the sample markup:

    $("#Spinner").css("visibility", "visible");
    fetch("https://www.mysite.com/api/dosomething") // some url
        .then(response => response.json())
        .then(function (response) {
            // do something with response data
            $("#Spinner").css("visibility", "hidden");            
        })
        .catch(err => {
           // handle error
           $("#Spinner").css("visibility", "hidden");
        });


The spinner is turned on right before the fetch call is made and then off when it completes. I also added it to the catch clause because the spinner would still remain active when it errors out since the code to deactivate it never executes.

Hope these tips help those young and upcoming rock-star developers. 🙂

Visit Winhost to learn more about our ASP.NET hosting solution

Don’t Fall for “I hacked your computer” Scam Emails

$
0
0

First of all, I want you to understand this email message you received is nothing but a scam and you weren’t really hacked. I’ll explain in more details as you read on.

This is by far one of the best spam email messages I’ve seen since I started working here at Winhost. Not only is it creative but some people are really paying bitcoins to not get “exposed.” That’s why this scam is popular.

Why are people falling for this scam?

This scam is often effective because the email message may contain your real password that you are using. Or, it may contain part of a password that you used in the past.

Or

The email states that the email message was sent from your email account to make you believe that your email was hacked. They may use the following text in their email message to you:

“I’m a programmer who cracked your email account and device about half year ago.
You entered a password on one of the insecure site you visited, and I catched it.”


“I have very bad news for you.
17/07/2019 – on this day I hacked your OS and got full access to your account YourEmailAddress@Yourdomain.com.
You can check it – I sent this message from your account.”

The hacker goes on to claim that they installed a Rat program on your computer and no matter what you do, you won’t be able to stop them unless you pay up. Don’t pay them anything. I’ll tell you why…

You might be asking…well… How did they get my password?

Well you probably heard of all of those nasty data breaches that have been reported on the news and all over the internet? If you were not aware or if you have no idea how anyone might have gotten your account information, there is a website that you can use to check your email address – or any known passwords you like to use and see if it’s part of a data breach. The website is called, “have i been pawned?“. This website’s main purpose is for ordinary people to visit and check if their information was part of any data breach. More about the creator can be found here.

Should I really use this website?

Well, the email message you received already contains your single plain text password. Your password has obviously been compromised before and checking how the hacker may have gotten it can’t hurt you at this point. The hackers also have the same tool to check your password. Hopefully, you are not using that password no more. If you are, change your password.

In the website, you enter the password that you received in the spam email. Their search will bring up what company or list contained that same password.

If your password was compromised, you will get the following message.

If your password has been discovered. It will also contain the number of times it’s been seen in breaches

“But, they sent me an email from my own email address. So how did they do that?”

Glad you asked. We need to check the email headers and check to see exactly where the email message come from. To get your email header we have the following knowledge base article that shows you how to retrieve this information. An email header may look ugly to a lot of people, but the coolest part is that it tells the story of how you received that email message. Email headers tell a story of the path the email took to get to your inbox.

The email header can be a little tricky to read but you can use some tools to decipher the email header.

The What’s my IP website has the ability to tell you the origin of the email message. Simply copy and paste the email header into the empty field.

Once you paste in the email header, click on the blue Analyze button. You will get the results of the originating IP number. This is the IP number of the mail server that sent out an email message.

You can check if the IP of the mail server is the same IP number or company that you’re using for your email service. If the IPs don’t match, then the email message has been spoofed – meaning someone just used an email system and changed the “From address” to use your email address. Email addresses are easily spoofed. Just YouTube “how to spoof an email address” if you are interested to learn more.

How do I prevent this from happening again? I hate seeing these damn emails!?

If the email messages you’re receiving are in fact being spoofed, then you have to set up an SPF record and DKIM for your domain name. If you’re using our email services we have the following knowledge base article that provides you with the correct SPF record you should use with our email service.

Is there anything else I can do to stop this email scam?

Yes, we also offer a spam filtering service that stops the bad email messages from ever touching our email systems. The spam filtering service starts to work at the MX level of the email service. This occurs when you change the MX record for your domain name to use the spam filtering service’s MX Records instead. The email messages that are sent to your domain users get routed to the spam filtering service first. Within their system the email messages get scrubbed and filtered and only the legitmate emails get sent to your inbox. Also, a nice feature that comes with our Spam Filtering service – if for some reason our mail server has an issue and can’t receive email messages for any reason – the Spam Filtering service holds on to the incoming email messages and sends it to the main mail server once the issue has resolved. Out of all of the services we offer, the Spam Filtering service is by far one of my favorite ones we provide to our customers.

If you have any questions or concerns about any email spam/scams, feel free to reach out to our technical support team.

Visit Winhost to learn more about our Windows hosting solution

“We don’t have backups”– The last thing you want to hear from your host

$
0
0

When you are in a bind to find missing website files, the last thing you want to hear from your hosting provider is “Sorry, we don’t have backups of XYZ.”

At Winhost, we do have a backup system in place to backup our customer’s website files and databases nightly. However, this backup system is intended for disaster recovery. We can pull files out of the backup system but this should not be your only backup source.

There have been times when I’ve had customers ask for certain files from our backups, and for one reason or another we didn’t have them because…

  1. The files requested were from too long ago.
  2. The files being sought were mistakenly thought to exist in the website and were not there.
  3. The customer didn’t touch their website for a while and during that time the site got compromised due to a vulnerability and the files requested were no longer there or had been overwritten/altered.
  4. On rare occasions, we have experienced backup system failures which made retrieving the files impossible.

In short, there are many different reasons a hosting provider may not have specific backups.

Be Prepared!

First off, if you haven’t already, download your website to your own computer. If you have any questions about downloading your website files or databases, let us know and we can help. You may want to get on a schedule to download your site every so often. For extra safety, you can copy the files to an external harddrive.

When you are making changes to your site, it’s always best to make the changes on your own computer and then upload the modified files to the webserver. This way you should have the latest copy. Keep in mind that making changes directly on the server may be convenient, but your local copy will be out of sync.

For those that prefer an automated solution for backups over manual methods, we launched our SiteBackup Service.

SiteBackup Service

If you want to make sure your website files and databases are being backed up – nightly, weekly or what ever your heart desires – then our SiteBackup service is a great way of automatically backing up your website and databases. And to protect you further, the backups are not located in the Winhost data center – they are on the Amazon cloud.

In addition, you get a separate control panel for your backups and the backup control panel is located outside of Winhost data center as well.

We have instructions in our knowledge base on how to configure SiteBackup. But if you want our support department to help you set up the SiteBackup service, just let us know after you order. We’ll help you set it up for you.

What type of options does SiteBackup have?

Below is a screenshot of the SiteBackup configuration options.

Some of the things you can configure are:

  • Specify the directories you want to backup
  • Type of files you want to exclude
  • Set retention period – anywhere between 3-30 days worth of backups
  • Backup frequency
  • Time of day and time zone you wish to start the backup

You can backup your MS SQL databases and MySQL database too.

How do I restore my site from my backups?

For your site files there is an option to simply restore within the SiteBackup service.

As well as an option to download the site files in zip format.

So the SiteBackup solution is a convenient way to take charge of your site backups. You can sign up for the SiteBackup service through your control panel. If you need help setting it up, just contact our support department. We can help set it up for you.

Visit Winhost to learn more about our SiteBackup solution

How to patch DotNetNuke’s Telerik.Web.UI.dll

$
0
0

Lately, we have been seeing a higher number of DotNetNuke (DNN) sites getting hacked via a known Telerik.Web.UI.dll vulnerability that’s been around for years. DNN released a patch a few years back. However, we have been seeing in influx of compromised DNN sites caused by this easy-to-fix vulnerability.

If you’re using DNN Versions 5.6.3 through 9.0.1 you must apply this patch to avoid disruptions to your site. More importantly, prevent it from getting hacked.

If you are running a DNN site and need help or want us to patch DNN for you, stop reading and contact our support department. We can help you apply this patch to your site at no cost. Please note that if your DotNetNuke site requires upgrading, then we can help you with that but we do charge for upgrading services.

Let’s Get Started:

Step 1:

First thing you need to do is download the patch directly from the DNN Site here: Critical Security Update September 2017

Once you have zip file from the DNN Site, you need to install it as you would an Extension within DNN.

Step 2:

Log into your DNN site as the SuperUser default login.

Step 3:

Navigate to: [HostingAccountDomain.com]/Admin/Extensions

Or look for the Extensions link within your DNN Site.

Different DotnetNuke versions may look different

Step 4:

Click on the Install Extension Wizard button

Step 5a:

Select Choose File button and select the zip file you just downloaded from DNN in Step 1 and click Next

Step 5b:

If you receive a random 500 or 404 error within your DNN site after clicking Next from Step 5. Please note the following, otherwise move on to Step 6 below.

You most likely received this error because you need to increase your maxRequestLength setting within your web.config file. You can access this file via FTP.

Look for the setting: maxRequestLength=”12288″

And change it to: maxRequestLength=”12288000

The above increases the limit to 28 MB.

Save your changes and upload the updated web.config file into the same directory overwriting the old web.config file.

Then try Step 5a again.

Step 6:

You will see the Package Information about the HotFix. Go ahead and click on Next.

Step 7:

Click Next on the Release Notes window

Step 8:

Read and place a check next to Accept License

Click Next.

You will then see the Package Installation Report. Click on the upper right X to exit out of the window.

Once your extension page is reloaded. You will see the newly installed Patch for your site.

If you are using DNN, make sure to look into this. There are hackers out there that are targeting DNN and we don’t want you to be a victim of their malicious activities.

If you have any questions or concerns, just contact us.

PHP 7.3 / PHP 7.4 with WordPress: Any speed improvements?

$
0
0

If you haven’t noticed we updated PHP version 7.3 with the latest minor update 7.3.17 and we also installed PHP 7.4.

Back in October I wrote about speed improvements that came with PHP 7.3. Now with the PHP 7.4 the internet world is claiming that this new version also has speed improvements compared to previous PHP versions.

Okay, but how much faster?!

Curious, I installed WordPress using the Winhost Max plan. This was a base WordPress installation using the default template and I evaluated the speed with Google Chrome’s Developer Tools and Google’s Page Insights.

The following are the results I got. Please note that your results will vary depending on plugins, themes, and PHP versions that you are using.

Google Chrome Developer Tools using PHP 7.2 – PHP 7.4

Using PHP 7.2 – 2.36 seconds
Using PHP 7.3 – 1.80 seconds
Using PHP 7.4 – 814 ms

Google’s PageSpeed Insights using PHP 7.2 – PHP 7.4

Using PHP 7.2
Using PHP 7.3
Using PHP 7.4

Just based on these test results, it appears that PHP 7.4 has improved its speed over the latest version PHP 7.3.

So how do you get started with PHP 7.4 and should you really use it?

Both PHP versions 7.3 and 7.4 require your site to be on our Windows Server 2012 / IIS 8 or 2016 / IIS 10 servers.

If your WordPress site is on an Windows 2012 /IIS 8 or Window 2016 / IIS 10 server, then you can go ahead and change the PHP version within the Winhost control panel.

Here is how to change the PHP version within the Winhost control panel.

  • Log in to the control panel.
  • Click on the Sites tab.
  • Click on your site account.
  • Click on PHP Version
  • Click on the drop-down menu and select 7.4
  • Click Update.

If your WordPress site is on a Windows 2008 server and your site is using an older PHP 5.3 – 5.6 version and you want to use the higher PHP versions., then you will need to first update your WordPress site to the latest version. Then your site will need to be migrated to our Windows 2012 or Windows 2016 servers. Note that using newer versions of WordPress will result in an error/warning if you’re using an older version of PHP. And remember, before doing any updating on your WordPress site, please be sure to back up the web site files and MySQL Database. That way if something goes wrong, you can always revert back to the old version of your site.

If your WordPress site needs to be migrated to our IIS 8 or IIS 10 servers, then just contact our support team and ask them to migrate your site to an IIS 8 or IIS 10 server. We’ll do the migration at no cost to you. Migration typically takes about one hour but really depends on how large your site is. We won’t have to migrate your database or email server as these are already on separate servers.

I also wanted to mention that even though we have PHP 7.4 installed on our servers, since it is new, there are still a limited amount of components/modules available. And although we tested PHP 7.4 with WordPress and everything appears to be working fine, at this time we are still not recommending using it in your production site – until the components/modules catch up. For now we have the latest 7.3 minor update installed and PHP 7.3 will work with the latest version of WordPress and provide you with adequate speed for your site.

It should also be mentioned that it is always important to backup your site before doing any work on your production WordPress site and that we do offer a great SiteBackup service that can automatically backup your site files and MySQL database on a nightly basis. Earlier this year, I wrote about why having backups are important. Please check out that blog post. If you need help setting up the SiteBackup service, please feel free to contact our support department for assistance. We will help you set it up free of charge.

That’s it for now. Have fun with PHP!

Visit Winhost to learn more about our WordPress Hosting solution

Using nopCommerce with MySQL

$
0
0

Nopcommerce 4.3 was released and with it, the ability to use a MySQL database. In this post I’ll be showing you how to configure your nopCommerce 4.3 with a MySQL database.

Like many applications, nopCommerce is installed in two steps. First, you install the nopCommerce application into your site and then you complete the software configuration by providing information through an Installation Wizard that you access through your web browser.

You can use our Application Installer to install nopCommerce 4.3 in your site. Follow the instructions in the first part of this Knowledge Base article to get the initial nopCommerce install done but you won’t need to create a new MS SQL database. The rest of the information in this blog post will give instructions on how to create a MySQL database and how to complete the nopCommerce Installation screen.

Now that you have installed nopCommerce in you site, we want to pull up the nopCommerce Installation screen to finish configuring nopCommerce. Assuming that your domain is not yet resolving to Winhost, you can complete the nopcommerce configuration using the Secondary URL we provide you. Here is how to find the Secondary URL.

  • Log into the Winhost control panel
  • Click on the Sites tab.
  • Click on your Site account.
  • Find “Secondary Web URL” under the Site Info section

Enter the Secondary URL into your web browser. You will be presented with the nopCommerce Installation screen. In this screen, you will provide specific information about your store and hosting account to finish configuring the application.

Enter the following information into the nopCommerce Installation screen.

  • Your nopCommerce Admin user email (Note: This could be the same Admin user for Winhost or a different email address)
  • nopCommerce Admin User Password (Note: Don’t use the same password as your Winhost control panel)
  • Confirm the Password

Next, you need to create a MySQL database through the Winhost control panel. Here are step-by-step instructions.

  • Login into the Winhost control panel.
  • Click on the Sites tab.
  • Click on your Site account.
  • Click on MySQL icon.
  • Click on Add
  • Enter the Database Name you wish to use
  • Enter the Database User
  • Enter the MySQL Storage Quota
  • Click on Create button

Now, you need to specify that you will use MySQL as your database and tell the nopCommerce application where the database is and how to access it. So, go back to the nopCommerce Installation screen and have the Winhost Control Panel MySQL section open in another browser tab so you can go back and forth to get and enter your information.

In the Database Information Section of the nopCommerce Installation screen, click on the Dropdown menu and select MySQL as shown below:

  • Leave the Create Database and raw connection string unchecked.
  • Enter the Database Server setting from the Winhost control panel into the Server Name field in the nopCommerce Installation screen.
  • Enter the Database Name setting from the Winhost control panel into the Database Name field in the nopCommerce Installation screen.
  • Enter the Database User from the Winhost control panel into the SQL Username field in the nopCommerce Installation screen.
  • Enter the Database Password for your MySQL database into the SQL Password field in the nopCommerce Installation screen.

Click on the Install button and wait for the installation to complete. This will take a few minutes.

Enjoy

Visit Winhost to learn more about our nopCommerce hosting solution

.NET Core and PHP Updates

$
0
0
Announcement

.NET Core
On our Windows 2012 and Windows 2016 web servers, both .NET Core 3.1.9 and .NET Core 2.1.23 ​are now available for framework dependent deployment (FDD).

Note: If you cannot use framework-dependent deployment for any .NET Core version, you can always publish using self-contained deployment (SCD). (For example, in our Knowledge Base, we show how to use self-contained deployment with Visual Studio 2017.) If any customers have questions about deployment, contact our tech support.

PHP
On our Windows 2012 and Windows 2016 hosting platform, we have made the following updates to PHP versions:

  • PHP 7.4 is updated to PHP 7.4.11
  • PHP 7.3 is updated to PHP 7.3.23
  • PHP 7,2 is updated to PHP 7.2.34

Visit Winhost to learn more about our ASP.NET Core hosting and PHP hosting solutions


Introducing Private SQL Server Service

$
0
0

Today we announce the launch of a new Premium Private SQL Server solution! Private SQL is your own dedicated Microsoft SQL Virtual Server that is not shared with any other customer. Since your SQL databases reside on their own server, they will have access to all of the server resources, like CPU, RAM and disk space.

private dedicated sql server

But don’t your hosting plans already come with SQL databases?
Yes, all of our hosting plans include Shared SQL server databases. With Shared SQL, many customer databases use the resources of a shared SQL server. Therefore, there are constraints imposed so that all SQL databases on the server performs well for all our customers. And on occasion, there can be a case of a “bad neighbor”, where another customer’s database can use up a lot of server resources, slowing down the SQL performance for your database as well as other customer’s databases. Our staff monitors the Shared SQL Servers and we will work to resolve such performance issues as quickly as possible.

With the Private SQL service, these constraints go away and you don’t deal with any “bad neighbor” situation. For example, you can have a very large SQL database.

SQL Server Customization
Because the Private SQL Server is for just your SQL databases, we can offer server customizations that we can’t do for the Shared SQL servers. For example, we can enable SQL Jobs, SQL CLR, install special monitoring software, or setup custom backup services.

Private SQL Server Plans
There are two base Private SQL plans – one plan with 4 CPU Cores and one plan with 8 CPU Cores. The server disk space storage starts at 200 GB and can be expanded if needed. You can select how much RAM you want for your Private SQL Server starting from 2 GB. And finally, you can select the SQL Server version that you want to use.

Visit Winhost.com to learn more about features and pricing of Private SQL Server solutions


Latest Images